Wednesday, February 26, 2020

Colorado's Blossoming Grape Growing Industry

Posted by: Miranda Ulmer, Viticulture Extension Specialist 

Today, Colorado is home to approximately 170 wineries and was rated by USA Today as hosting the best wine festival in the nation (Colorado Mountain Winefest), but it hasn’t always been that way…

                        Young vines; photo courtesy of Colorado Wine 

The first recorded planting of grapes in Colorado took place in 1890 by George A. Crawford, the founder of Grand Junction, who planted 60 acres of grapes and other fruit in Palisade, CO. In 1899, it was reported that 586,300 pounds of grapes were harvested and 1744 gallons of wine produced. A decade later, this increased to 1,037,614 pounds of harvested grapes. Prohibition was enacted in Colorado in 1916, which brought the industry to a halt, and vineyards throughout the state were uprooted. Prohibition ended in 1933, but it wasn’t until 1968 that the grape & wine industry took off again.

Grand Valley AVA; photo courtesy of Colorado Wine
In 1974, CSU’s Orchard Mesa Research Station in Grand Junction began vineyard research, and in 1982, the Rocky Mountain Association of Vintners and Viticulturists, now known as the Colorado Association for Viticulture & Enology (CAVE) was formed (www.winecolorado.org/). Further, the Colorado Wine Industry Development Board was created in 1990 as part of the Colorado Department of Agriculture (coloradowine.com/). Also in 1990, the Grand Valley, from the mouth of the DeBeque Canyon in Palisade to the foot of the Colorado National Monument in Grand Junction, was recognized as a federally designated American Viticultural Area (AVA). And in 2001, the West Elks region along the North Fork of the Gunnison River between Bowie and Hotchkiss was recognized as its own AVA.

West Elks AVA; photo courtesy of Colorado Wine
What makes Colorado unique? Grapes in Colorado are grown between 4,000-7,000 ft in elevation; this is among the highest altitude grapes grown in the world. Also, in Colorado we experience 300+ days of sunshine each year, which hastens the ripening process. The grape growing regions of Colorado have alkaline soils, which differs from other growing regions, such as Napa Valley. Lastly, the dry climate experienced by the grape growing regions in the state lead to low pest & disease pressure.

Miranda Ulmer, CSU Viticulture Extension Specialist; photo courtesy of GJ Sentinel

Fast forward to today, 90% of the grapes grown in the state are grown in Mesa and Delta counties. Common varieties planted in Colorado include Cabernet Sauvignon, Merlot, Cabernet Franc & Riesling. Colorado has a full-time Statewide Viticulturist & Professor, Dr. Horst Caspari, as well as a Viticulture Extension Specialist, Miranda Ulmer to support the research and extension needs of the industry. Email miranda.ulmer@colostate.edu if you would like to be added to the Viticulture Extension Newsletter email list or visit us at viticulture.colostate.edu to learn about upcoming events & ongoing research!

Tuesday, February 25, 2020

The Adventures in Vermicomposting

Posted By: Lisa Mason, Arapahoe County Extension

The start of a new year also means it is time to plan the 2020 gardening season! If you are ready to get started now in the cold, winter months, consider starting a vermicomposting bin!
Vermicomposting is a method of composting using worms that offers a variety of benefits, including reducing landfill waste and having nutrient and microbe-rich compost to add to our gardens and house plants.
According to North Carolina State University Extension, “in 2006, the U.S. EPA estimated that 55-65% of the waste generated in the United States is residential. Most of what we throw away is organic materials that could be vermicomposted, composted, or recycled. Paper and paperboard products account for 34%, and food scraps and yard trimmings make up 25% (by weight).”
Vermicomposting is a fun way to reduce waste in your home. Since the worms need to stay between 59 – 77 degrees Fahrenheit, most people that live in cold winter climates choose to have their worm bin inside the house, including the kitchen or basement. Having the bin in the house provides easy access to feed the worms. If the bin is functioning correctly, it will be low maintenance and not emit any negative odors.
Red wigglers just added to the worm bin. Photo: Lisa Mason
My husband and I started our first worm bin in November.  So far the process has been a little trial and error to get the right conditions in the bin. Now that we have the conditions right, the bin has been very low maintenance. We have thoroughly enjoyed watching the worms in their ecosystem.
There are a variety of bin options available to purchase. You can even make your own bins with tutorials found online. If you choose to make your own bin, be sure it has adequate air circulation. Some bins have a spout to collect the liquid from the base of the bin which is a nutrient-rich compost tea. We chose a bin that is made of beetle-kill pine made locally in Colorado. We chose that bin because we like to shop local and beetle-kill wood products support Colorado’s forest health. The wood bins also offer nice air circulation. The only challenge we had with a wood bin is maintaining enough moisture inside the bid. We routinely add some water to make sure the bedding stays moist for the worms.  
Our new worm bin! We can have up to 5 layers, but right now we started with one. Photo: Lisa Mason 
 Here are a few tips for getting started:
  • The materials you need include: a bin that contains moisture and provides darkness for worms, bedding, water, worms, and kitchen scraps.
  • Kitchen scraps can include fruits, vegetables, coffee grounds and filters, tea bags, finely crushed egg shells, etc. Cut up kitchen scraps for faster composting.
  • Foods to avoid adding to your worm bin include dairy, meat and citrus.
  • Bedding provides the worms a place to live. You can use shredded newspaper (black ink only) and shredded cardboard.
  • Keep the bedding moist. All bedding should be as wet as a wrung-out sponge.
  • Red wigglers (Eisenia foetida) are the best worms to use for vermicomposting. They can be ordered along or purchased at some local garden stores and bait stores.
  • Add kitchen scraps slowly. If you add too much food too quickly, the bin may start to smell or attract pests like fruit flies. Cover all food with more bedding to bury it. As the worm bin becomes more established, you can increase the amount of food in the bin. 

The wet bedding provides a home for the worms. Photo: Lisa Mason
After several months, you will have nutrient rich compost! According to the University of Nebraska Extension, “compared to ordinary soil, the worm castings contain five times more nitrogen, seven times more phosphorus and 11 times more potassium. They are rich in humic acids and improve the structure of the soil.”
If you are interested in a fun, fascinating winter project, I recommend reading the following resources:
Happy Vermicomposting!
We love our worms! Photo: Lisa Mason


Monday, February 17, 2020

My Gardening Playlist

Posted by: Alison O'Connor, Larimer County Extension

[Full disclosure: this blog is not based in science or research. It's just a fun, breezy blog in anticipation of spring.]

I love music and my trusty iPod is always by my side. Anytime I'm in the garden for an extended period of time, I have my tunes playing. It's almost like the background noise to my life. The songs I like are a motley crew of random. Line-dancing country? Yes. 60s pop? Yes. Seattle grunge? You bet. I have an appreciation for the old, the new, and the completely cliche (here's to you, Taylor Swift).
I love my iPod! (Please don't stop working.)
It got me thinking about the best gardening songs of all time. Not the ones I listen to when I'm pulling weeds, but songs that have some reference to gardening in the title. Guess what? There's a lot! I've been documenting songs for a few weeks now, carefully checking song titles on Alexa and XM Radio. Here's my list of the Top 10 Gardening Songs...in no order and not by importance. I listed some runners-up below and I'd love to hear your choices in the comments! Best album title goes to Stevie Wonder and his "Journey through the Secret Life of Plants."

10. "Let it Grow" by Eric Clapton. A beautiful song with lyrics like "...plant your love and let it grow." Whether or not it's actually referring to plants or a larger meaning, you'll have to ask Mr. Clapton.

9. "Grazin' in the Grass" by Friends of Distinction (there's an instrumental version with amazing cowbell by Hugh Masekela--more cowbell!). "I can dig it...he can dig it...she can dig it...we can dig it...they can dig it...you can dig it...oh, let's dig it!" I'm sure they are talking about bindweed.

8. "Roses" by Outkast. Now, there's a lot of songs about roses and this one just makes me laugh because it's about those cool kids in high school...and how maybe they really weren't that cool? (It's true that real guys go for real down-to-Mars girls.) Runner up rose songs include "Every Rose Has a Thorn" by Poison, "The Rose" by Bette Midler, and "Buy Me a Rose" by Kenny Rogers.

7. "Octopus's Garden" by The Beatles. Sing it, Ringo! A fun, happy, sing-a-long song from my favorite band in the world. During my undergraduate landscape design class, I created an entire Beatles garden. Which also included...

6. "Strawberry Fields Forever" by The Beatles. Nothing is real. John Lennon wrote this song based on a Salvation Army children's home in Liverpool, England. And yes, as a superfan, I visited the red gates when I was in Liverpool.
My "Let it Beatles" garden for my landscape design class way-back-when.
5. "Purple Rain" by Prince. The man, the legend. The fellow Minnesotan. But you can't grow plants without water, and rain is in short supply in Colorado. So no matter the color, rain is good! "I only wanted to one time to see you laughing in the purple rain."

4. "Green Onions" by Booker T. and the MGs. An absolutely awesome, jazzy instrumental released in 1962 on an album of the same name. There is controversy on how the song got its name. One of the band's guitarists said it was originally called "Funky Onions" but that the name seemed too low-class. Another guitarist said it was named after his cat Green Onions. Regardless, it's a fun tune to a garden staple that grows well in Colorado.

3. "Wildflowers" by Tom Petty. This is probably my favorite Tom Petty album, but I also love this song. It's mellow and simple, with a guitar providing most of the backing music. "You belong somewhere you feel free", like in a garden or a field of wildflowers.

2. "Tupelo Honey" by Van Morrison. This is, without a doubt, one of my favorite songs. Tupelo honey is quite rare, only found in a small region in Georgia and Florida in the swamps where White Ogeechee tupelo trees grow (in the Nyssa genus). The honey has hints of cinnamon and floral. "She's as sweet as Tupelo honey; just like honey, baby, from the bees." We all know how important our pollinator friends are to our gardens.

1. "Garden Party" by Ricky Nelson. I wish I got an invite to this party! Yoko, Bob Dylan, and George Harrison (alias Mr. Hughes). We can all take the refrain to heart, "You can't please everyone, so you got to please yourself."

Other songs that made my list include:
What did I miss? Any gardening tunes that should have made the list? Since I'm not techy (I still have an iPod!), I bet there's already a playlist created on Spotify. Spring is on the horizon!

Thursday, February 13, 2020

The Basics of Composting


Published by Kara Harders, Small Acreage Management Specialist 


Composting is a natural process we can utilize to help break down and recycle materials which would have otherwise been considered trash or waste. Materials including food scraps, garden byproducts, and other organic “trash” can become the magical soil amendment we know as compost!

Because composting is a natural process, it can be induced by following some basic rules and creating ideal conditions for the process to happen. While people may think they are the ones composting it is really bacteria, fungi, molds, and worms doing all the heavy lifting. When we compost it is important to keep these organisms happy and healthy so they can do what they do best, turn trash into soil gold! Luckily, they only need a few things to do what they do best.

Food! (Nitrogen and carbon rich)
These composting critters work best when given about a 30:1 Carbon to Nitrogen ratio. The carbon source could be dead plants, bedding, grass clipping, leaves or even shredded office paper. The nitrogen source could be fresh grass cuttings, food scraps or animal manure.

Moisture
Like all living things, water is essential to the life in your compost heap. Most of the organisms breaking down materials in your compost pile live in the film of moisture around the “ingredients” in the pile. Too little moisture and they will die or become dormant and too much moisture and they will drown (and the pile will smell BAD). Aim for a pile that feels damp, like a wrung-out sponge. If the pile gets too dry spray it lightly with a garden hose and try to keep it covered with a tarp in a shady area to retain moisture and to keep out heavy rains. 

Form
Compost needs to be grouped to maintain moisture and heat; therefore, the structure of your compost needs to be in a heap of sorts. This may seem obvious, but there are a few critical details.
Consider where you are putting your pile, avoid spots in direct sunlight for much of the day as this can dry out your pile. You should also avoid areas where water collects or drains. Compost piles are rich in nutrients that can be harmful to water ways and contribute to nutrient pollution. Think about keeping water from running through the pile when it rains or snow melts.
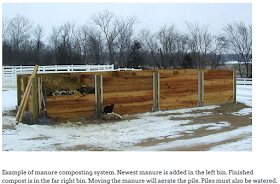
An ideal size is about on cubic yard, a pile this size can be built over time (cool composting) or all at once (hot composting), a benefit to doing hot composting is the sterilization of some weed seeds. Large heaps made all at once with the correct balance of materials and moisture can break down materials so fast the internal temperatures of these piles can reach 160ºF! Smaller piles wont hold heat as well and can dry out quickly if done outside of a container, but they will be easier to turn. Speaking of turning…

Aeration
All those composting organisms you are after also need to breath, in addition to design, to get them oxygen you will need to “turn” the pile.
Ideally, your compost pile will sit on some coarse materials to help allow air travel in from the base. When setting up the pile make an effort to use materials which create air pockets, such as stems, stalks, wood chips and other rigid materials. These will help to draw air up and out of the pile.
Use a composting thermometer to gauge the inside temperature. When it reaches 140ºF, give it a turn and water as needed. Turning the compost will also help get air to the organisms doing the dirty work. You can turn the compost as often as the temperature reaches 140ºF. It is recommended to let the pile go through three heating cycles to help sterilize weed seeds.

Particle size
While it is not always possible or realistic to select items for your compost pile by size it can make it more efficient. Because the organisms breaking down material work on the outer surface of the composted materials, they work much quicker when the surface area is large in relation to the particle size’s mass, in other words, small pieces break down much faster. You can mulch logs/branches, cut stalks to less than 5”, mow leaves with the lawn mower, and break up manure clumps.


Sunday, February 9, 2020

Top Ten Best Management Tips for Starting Your Garden from Seed

One of the oldest horticultural practices in the world is seed starting.  Real gardeners know that you never stop thinking about or putting into practice, your garden.  The catalogs have arrived, you have dog-eared your pages, made your lists and ordered your seeds and they are now arriving.  So now, the plans begin for what you will start indoors and when. 

Since the cool season vegetables and annual flowers can be planted directly in the garden when soil temps permit, it is the warm season plants you should be scheduling.  These plants need warmer soil temps to germinate, and in our 100-120-day average growing season, they need a little “head start” indoors before heading outside to complete their production.   Seed packets are the “go-to” for instructions as to when each variety should be started indoors, but rule of thumb, with few exceptions, is 6-8 weeks before the last average frost date for your area.  Here, in our zone, the smart gardener shoots for mid-May to first of June for putting out their precious transplants.

We all adapt our gardening practices to suit our needs as we become more accomplished.  However, there are some tried and true practices that will guarantee success for the beginning seed starter.  When things don’t work out, always go back to the following practices to sort out your issues and you will have a great start to a successful garden year. 


Courtesy Megapixl.com


1.       Seed - Start with clean, fresh seed.  Explore the wondrous variety of each vegetable or flower you plant by checking out the offerings of the seed companies, either online or by catalog.
Courtesy:  Adventures of Mel
Green leaf lettuce is great, by why not try Strawberry Cabbage lettuce, or Drunken Frizzy-Headed Woman lettuce, or deep burgundy Merlot lettuce.  Try the Easter Egg collection of radishes and Dragon Tongue Beans.  Obviously, plant what your family will eat, but check out all the amazing possibilities in each variety and try at least one new thing each year to add diversity to your garden.
 
2.       Equipment – You do not need to spend a fortune to garden.  Be creative and re-purpose items to start your seeds– just think outside the box.  You’ll need a container of some kind to plant in, a tray to capture moisture, a “lid” to create a terrarium effect during germination.  There are many possibilities of seed starting trays to purchase, that make the activity both easy and safe.  But you can re-purpose yogurt cups, paper cups, deli containers, plastic fruit boxes (they even come with their own lid) to name a few, just make sure you add proper drainage.  If you re-use old plastic pots or any other container, make sure to sterilize them and air dry them before planting. 
Courtesy:  Lovelygreens.com


3.       Planting Medium - The more sterile the medium, the better your success.  This is not the place to use garden soil, or even potting soil.  Go for a seed starting mix, sometimes called germination mix.  These have no soil at all, but is a mixture of peat moss, vermiculite and/or perlite.  It is sterile and light weight to allow for the tiny plants to send roots out easily and avoid any soil-borne diseases that might attack your little plants. 

4.       Planting Depth – This is one of the biggest rookie mistakes.  Always check the seed packet for the planting depth.  A large percentage of seeds are so tiny, that correct planting depth is actually ¼”.  In this case, seeds should be placed on the top of moistened, unpacked soil and then a quarter inch layer of medium sprinkled on top, much like a chef would sprinkle salt to season food.  Then a very gentle one finger tamping over the seed to create seed to soil contact – no packing down at all. 

5.       Germination – To germinate properly, seeds need warmth and moisture.  The correct steps are as follows:
(a)The best procedure for planting seeds is to moisten the germination mix prior to starting.  The medium should be moist, but never wet.  You should be able to scoop up a fist full.  Squeeze and the ball should hold it’s shape, but when dropped from a 2to3 -foot height back into the container, it should break completely apart.  So, damp/dry is the term.  Fill each container or cell and tamp on the table to settle – never press or pack the medium.
(b) Sprinkle or spread the seed on top.  Remember to read the packet for the correct dept.  Larger seeds may need to be planted at ½” so you could make a small hole for these. 
(c) Cover the seed with the correct amount of medium
(d) Add a bit of moisture with a spray bottle – not a watering can
(e) Cover with a lid and place in a warm spot.  You will want a terrarium effect to happen over the next day or so.  Following all the above instructions should prevent you from having to add water during the germination phase.  The terrarium should do it.  If this does not occur, you likely did not have your medium moistened properly.  You may need to open the lid and spritz with warm water to create adequate moisture. 
(f) Again, consult the seed packet as to when to expect your seedlings to germinate, so you know if all has gone well.  Once they have germinated, the lid should be removed, and lights added. 

6.       Lights – Very few species of plants require light to germinate (again – the seed packet will give you this information if required).  So, once your seeds have germinated, it’s time to add light.  Although possible to use window light, here is the only place where I would suggest you invest some money.  A simple shop light casing with a T-12 Cool Ray and a Warm Ray bulb will easily do the trick.  However, the newer LED T-8’s are 50% more efficient.  Lights should be approximately 2” from the top of the seedlings at all times, so you need to be able to adjust as the seedlings grow.  Lights should be on 14-16 hours per day and there should be 8 hours of darkness for proper growth.  An inexpensive timer helps here.

Courtesy:  Home Depot


7.     Warmth - warmth added from below throughout germination and the 8 weeks of growth is recommended.  There are plant heat mats that can be purchased, or you can re-purpose old heating pads with temps set on low. 

8.       Air – It is helpful to add some movement and air circulation once your seedlings are about 3-4 inches high.  Good air circulation will help keep moisture off the surface of the soil and the leaves as well as strengthening the stems.  The goal is short and bushy, not tall and leggy. 

9.       Watering and Fertilizing – Water when soil is nearly dry, but never dry all the way.  Never wet either.  Watering from the bottom tray is recommended to keep moisture off the tender leaves. 
You can begin fertilizing when the first set of true leaves are established.  This will be the second set you will see, the first being the cotyledon leaves.  Use any liquid fertilizer of your choice at one quarter strength. 

10.   Become a Good Planner and Record Keeper - There is no substitute for good record keeping.  Thomas Jefferson is a premier example of good garden planning and record keeping with his meticulous notes.  If he can do it, so can you. For great suggestions, check out the January 30 post on this blog by Linda Langelo on great record keeping tips. 
This is a great time of year to find a good class on seed starting near you.  For the best science- based information, as well as any questions about starting your garden from seed, contact your local CSU Extension office.


By Patti O’Neal, Horticulture and Food Systems Coordinator, CSU Extension, Jefferson County.


Friday, February 7, 2020

Encouraging Pollinators in Your Garden and Community


So when people talk about pollinators, what do you think of?    Well, most people go to Honeybees.  Did you know that the common Honeybee is actually from Europe?  They are great for pollinating our Rosaceae (Rose Family) fruit crops, which includes peaches, cherries, apples, strawberries and raspberry among many more.  Honeybees will feed strictly on my flowering plant at a time, such as peaches, before they move onto other plants.
Honeybee, Lisa Mason CSUE Agent
 Our native pollinators including native solitary bees, syrphid flies (hover flies), bumblebees, beetles, butterflies, moths and animals like bats.  Most of these native pollinators need a variety of resources to get enough nutrients.  They are grazers or buffet eaters rather than eating just one item at a time.  I am sure you know people that fit into both those categories. 
Common blue butterfly-TRA
Of course, there are native pollinators that have specific relationships with one plant such as the yucca moth, Tegeticula yuccasella, which lives its entire life in some way on or within the Yucca and the Gaillardia moth, Schinia masoni.  So always exceptions to the rule.
Yucca moth- Malisa Science Source photo
In Colorado, we have 946 native bees, 250 species of butterflies, 1000 species of Moths, many wasps, beetles and flies.  This information can be found at https://www.colorado.gov/pacific/agplants/native-pollinators

Of the syrphid flies, aka hover flies aka flower flies there are 900 species in North America.  Many of these look like bees so birds and other creatures do not try to eat them.  I personally find them quite cute. And they are also beneficial insects!
syrphid fly-bugguide.net
So what can you do in your garden and your community?  You can plant a variety of plants, native plants, and do your homework on what each specific pollinator needs.  For example, solitary bees need bare soil to build their nests.  It may appear that there is a colony, but there it is actually more of an apartment or town-home situation where one bee lives in their own condominium. 
Solitary bee- MaLisa Spring Photo

Or take note of what pollinators you are attracting.  Some of our agents do citizen science projects, which help us to track what people are seeing.  Some pollinators will need a source of water other than just pollen and nectar.  So shallow water sources can be a benefit in the garden.  Planting a variety of types of plants will assist as well.  Some of the native bees like to nest at the base of native grasses such as Little Bluestem https://xerces.org/blog/plants-for-pollinators-little-bluestem
Standing Ovation little bluestem- Colostate
Do not only plant a variety of plants that bloom at once, but that grow and bloom throughout the year.  For example, we had a yarrow in our demonstration garden blooming last November and I observed syrphid flies hovering over and feeding on the yarrow.  Use natives from your area.  Some cultivars are so far from their origin that they are not good sources of pollen and nectar.  Typically, plants with double or triple the number of petals, tetraploids, are NOT good for a pollinator garden.
Pollinator on Columbine
 For more information on pollinator habitat see our factsheet: https://extension.colostate.edu/topic-areas/insects/creating-pollinator-habitat-5-616/

Take care of weeds!  Weeds compete with natives and garden plants and typically are not a good source of pollen and nectar for the pollinators.  Weeds also affect the environment and agriculture but out competing, stealing resources, attracting insects like aphids and overall just look messy.  Support conservation efforts of plants in your area.  If you need education on native plants, which ones are good pollinators, historic uses, plant id and landscape sustainability, check out the CSU Extension Native Plant Master’s Program.  We have 13 counties that offer this series of classes. http://conativeplantmaster.colostate.edu/

By Susan Carter, Horticulture and Natural Resource Agent in the Tri River Area


Tuesday, February 4, 2020

Removing Forest Fuels Now for Defensible Space Later

Posted by Mark J. Platten, Teller County Extension Director

As my cohort, Sherie Caffey, spoke about in a recent blog article, now is a good time for pruning and trimming trees for most species. This is especially true if you are one of the many Coloradans who live in the wildland-urban interface (WUI – pronounced woo-eee). The WUI is any area where structures and other human developments meet or intermingle with wildland vegetative fuels. In many vegetation types, it is not a matter of if a wildfire will impact your home, but when.

Forest Fire photo by Skeeze

Defensible Space

For those of you who live in this zone, you’ve probably heard the term “defensible space” thrown around at an emergency management meeting or even a training put on by the various fire departments or natural resource agencies across the state. A misnomer is that if a homeowner creates a defensible space around their property, it will survive a wildfire. In truth, when fires like the 2002 Hayman, 2012 Waldo Canyon, or 2013 Black Forest fires occurred in my area, they were so massive, with winds pushing embers more than a half mile from the fire front, that it is not fair to say any home in the direct path of those fires were “defensible,” not if we value human life over our homes.
       
The key is to reduce fire intensity as wildfire nears the house. This can be accomplished by reducing the amount of accomplished by the amount of flammable vegetation surrounding a home. Consequently, the most important person in protecting a house from wildfire is not a firefighter, but the property owner. The action taken by the owner before the wildfire occurs (such as proper landscaping) is the most critical and is why we’re talking about this topic in winter.
       
Photo by Skeeze
The term does mean is that we can give ourselves a better shot at having our home survive a wildfire and if it is safe for the firefighters to get their vehicles in and back out of your property, they may be able to help protect your structures. If enough of your neighbors, communities, and local/state/federal lands around you are mitigated in a defensible space format, it will likely help slow a wildfire’s advance.
     
So, while you’re sitting at home because of the recent winter storm (at least that’s what I’m doing) you may want to think about the following steps in providing defensible space around your home and some additional steps in making sure your home isn’t a tinderbox for embers.

Defensible Space Zones

Zone 1

The width of Zone 1 extends a minimum distance of 15-30 feet outward from a structure, depending on property size. Most flammable vegetation is removed in this zone, with the possible exception of a few low-growing shrubs or fire-resistant plants. Avoid landscaping with common ground junipers, which are highly flammable.


Zone 2
Defensible Space Diagram

An area of fuels reduction designed to diminish the intensity of a fire approaching your home. The width of Zone 2 depends on the slope of the ground where the structure is built. Typically, the defensible space in Zone 2 should extend at least 100 feet from all structures. If this distance stretches beyond your property lines, try to work with the adjoining property owners to complete an appropriate defensible space.


Zone 3

Has no specified width. It should provide a gradual transition from Zone 2 to areas farther from the home that have other forest management objectives. Your local Colorado State Forest Service forester can help you with this zone. This zone provides an opportunity for you to improve the health of the forest through proper management.

The Home Ignition Zone


Two factors have emerged as the primary determinants of a home’s ability to survive a wildfire – the quality of the defensible space and a structure’s ignitability. Together, these two factors create a concept called the Home Ignition Zone (HIZ), which includes the structure and the space immediately surrounding the structure. To protect a home from wildfire, the primary goal is to reduce or eliminate fuels and ignition sources within the HIZ.


Roof

The roof has a significant impact on a structure’s ignitability because of its extensive surface area. When your roof needs significant repairs or replacement, use only fire-resistant roofing materials. Also, check with your county building department – some counties now have restrictions against using wood shingles for roof replacement or require specific classifications of roofing material. Wood and shake-shingle roofs are discouraged because they are highly flammable and are prohibited in some areas of the state. Asphalt shingles, metal sheets and shingles, tile, clay tile, concrete and slate shingles are all recommended roofing materials.


Roof Eave and Soffits

Soffit Example
The extension of the roof beyond the exterior structure wall is the eave. This architectural feature is
particularly prone to ignition. As fire approaches the building, the exterior wall deflects hot air and gasses up into the eave which is usually cased in a soffit. If the exterior wall isn’t ignition-resistant, this effect is amplified.
       
The soffit is the skin that covers your eaves — without it, you would see your rafter beams fully exposed. Functionally speaking, soffit protects your rafters from the weather elements. Also, soffit helps your building breathe.  With vented soffit, air can flow through the vents to provide regular air circulation to your attic. This venting is where the embers can be carried into the attic and burn the home from the inside out. You’ll want to make sure your soffits are rated for the heat a wildfire could bring and that any vents are covered with 1/16 steel mesh to prevent embers from being pulled into your home.


Decks


Home burning photo by Mark Thiessen
Most decks are highly combustible. Their shape traps hot gasses, making them the ultimate heat traps. Conventional wooden decks are so combustible that when a wildfire approaches, the deck often ignites before the fire reaches the house. This mostly happens because the decks are open beneath and dried leaves, twigs, grass, and other tinder items are contained there so when an ember gets blown under the deck, it combusts. Again, 1/16 metal screening placed around your deck after you clean out all the debris, woodrats, skunks, cats, and neighborhood children, is the best protection from embers.


Windows

Windows are one of the weakest parts of a building with regard to wildfire. They usually fail before the building ignites, providing a direct path for flames and airborne embers to reach the building’s interior. Don’t plant shrubs directly below your windows or they could contribute to the windows failing.


Gutters/Chimney/Dryer vents/Stucco gaps

Photo by KRCR News
All these areas are where embers can either ignite or be brought into your home.  Make sure your gutters are clean and even better would be to install gutter guards to prevent buildup of needles, leaves and other debris. The chimney should have an ember arrester on it to prevent you from starting   Finally, a vigilant homeowner who has taken to the steps to build a stucco home for fire protection will want to seal the gap on the outside bottom of the home where the stucco often ends just before meeting the ground. There is a gap of ½-1 inch that is often filled with steel wool to prevent mice from getting in but guess what happens when embers meet steel wool…fire.
a forest fire. An often overlooked item is your dryer vent that could be a vector for embers.
       
Photo by Mark J. Platten
So, while you’re watching the snowflakes swirl around you, take a break and head outside to do an
inventory of possible issues on both your landscape and home. Then make sure to mitigate those issues to help your home survive the next wildfire.

Additional resources and links can be found here: https://extension.colostate.edu/disaster-web-sites/fire-resources/#land