CO-Horts

CO-Horts Blog

Showing posts with label garden. Show all posts

Thursday, September 7, 2023

Some Superior Annuals from 2023


Some Superior Annuals from 2023

Colorado State University

J.E. Klett


The following annuals are some of the top picks from both public and industry evaluations.

The public evaluations were held on August 5, 2023 and industry evaluations were held on August 8th, 2023.

Official winners will be posted in late September on our website: https/www.flowertrials.colostate.edu


Begonia Hybrid ‘Stonehenge Rose Bronze Leaf’ from Benary®

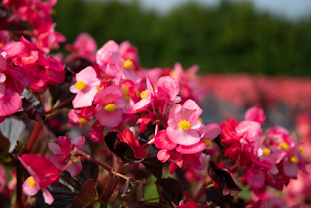
This plant can go everywhere- sun, shade, ground, and containers! It has performed really well and will just keep getting bigger and better until a killing frost. In addition, the breeder is planning to release more of these into the Stonehedge series but with different color onto the market in the next couple of years!


Centaurea ‘FanciFillers Chrome Fountain’ from Westhoff

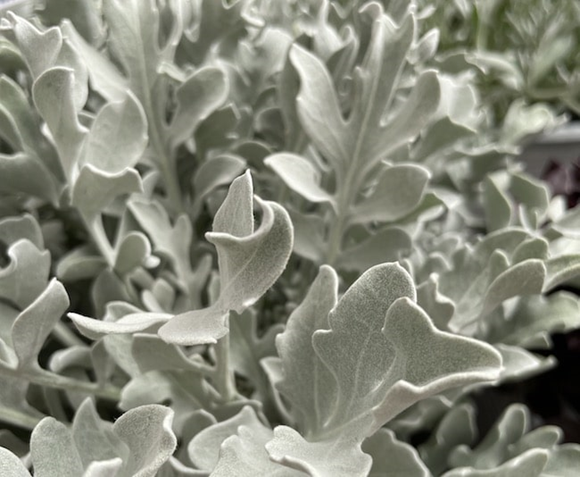
The silvery-white foliage makes a dramatic statement all by itself but combines well with many other plants. Heat loving, drought tolerant has an impressive uniform and mounding growth habit. It makes a great thriller in potted or hanging combos as well as a subtle touch in ground displays.


Coleus ‘Flame Thrower Sriracha’ from Ball FloraPlant


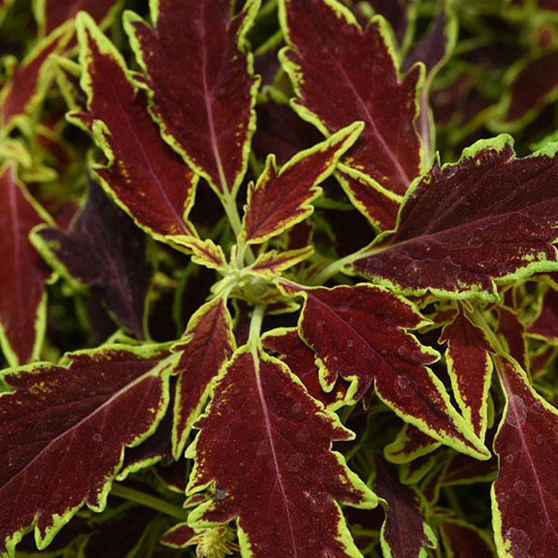
Dark red leaves are highlighted with a pop of lime green edging that help create a great looking plant. The overall look is enhanced by its very uniform growth habit. It had almost no flowering which is desirable for Coleus since it is primarily grown for its colorful foliage. It thrives in sun and shade.


Dahlia ‘Dahlegria® Apricot Tricolor’ from Syngenta

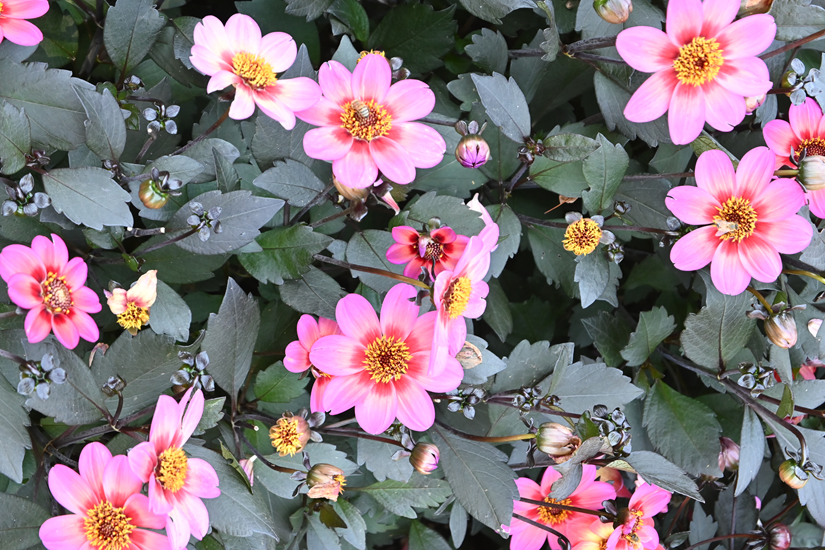
This Dahlia was a strong favorite due to its impressive combination of dark foliage and large, colorful flowers. Blooms had a unique blend of three colors that really stood out against the very dark leaves. The single petalled flowers were also a magnet for pollinators. The attractive plants had a nice upright growth habit and size that would work well in both the landscape as well as a container.


Lantana ‘Passion Fruit’ from Ball FloraPlant


Selected for a combination of prolific flowering and great multicolored flower with tropical fruit colors, it is also known for having consistent flowering through the season and not cycling in and out of bloom. Dark green foliage really helps the flower colors “pop”. The uniform habit makes a great groundcover for the garden. Plants are very tolerant of heat and drought.


Ptilotus ‘Joey’® from Benary®


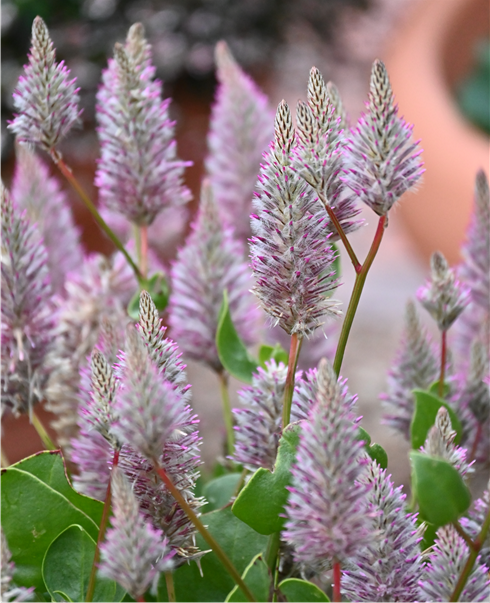
Few flowers in the garden have a form as unique as this one. The large conical spikes of feathery flowers have a great lavender color and are very long lasting. The original species comes from central Australia and have thick silver green foliage which helps make it very tolerant of drought and heat.


Rudbeckia ‘Sunbeckia® Luna’ from Flamingo Holland/Bull Breeding


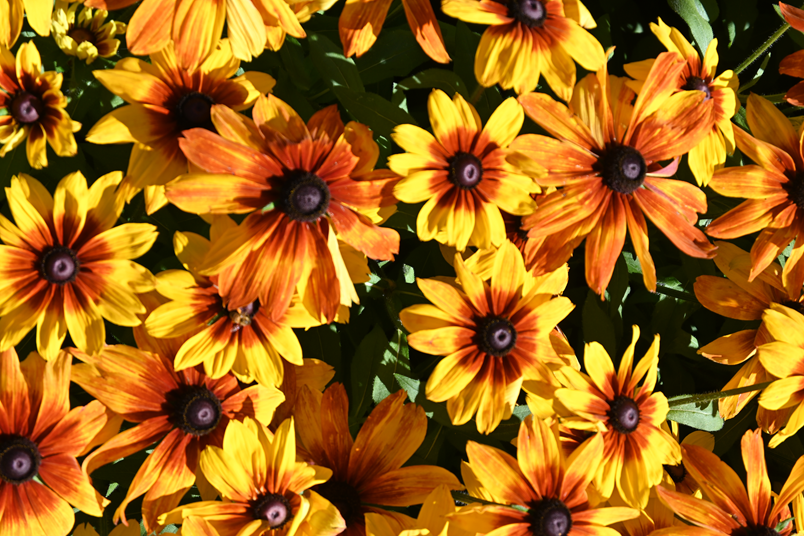
Few plants have the flower power like this one which caught the eyes of almost everyone, even from across the garden. The large flowers are very showy by themselves, but the sheer number of blooms is also very impressive as the foliage is virtually obscured by yellow blooms. The flowers are long lasting for a great display lasting late into the season. Sunbeckia ‘Ophelia’ had the same ranking and had impressive flowers but with a green eye.


Salvia ‘Black and Bloom’ from Ball FloraPlant


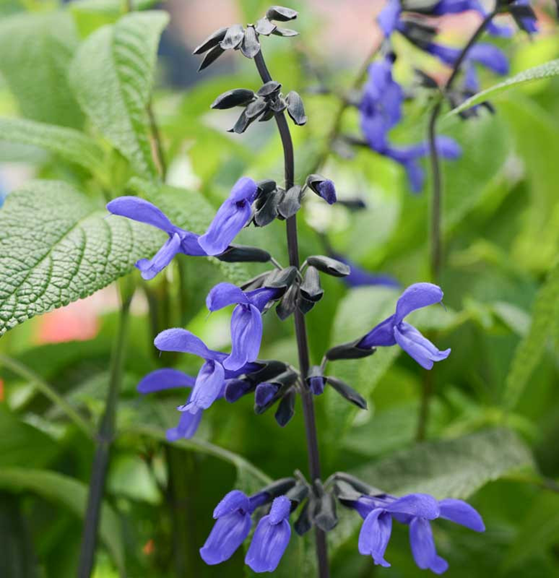
Deep blue flowers and a black stem made a great visual combination which was extremely popular. Plants were noted for a larger flower and darker stems than similar varieties. The breeder noted that it was developed to thrive in drought and heat as well as humidity.


Salvia ‘Mystic Spires’ from Ball FloraPlant


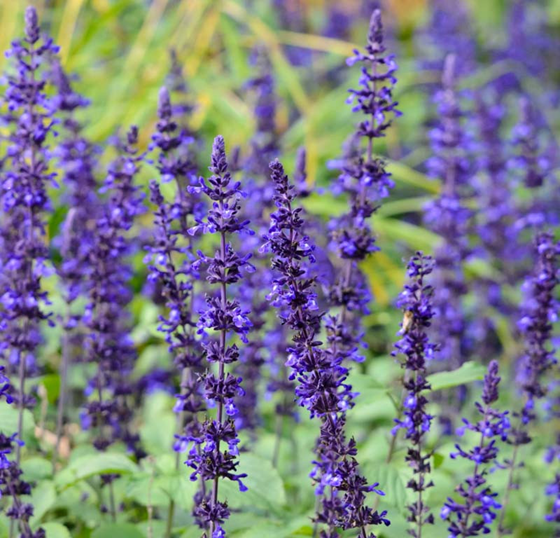
This was a standout with its ever blooming, well branched plant and prolific flowering. Its massive and sturdy stems add great substance to the garden. The hummingbirds are nearly constant every hour of the day. They are easy to grow, reliable for color and have moderate drought tolerance (but preform best with fertilizer and regular watering).


You should plan to plant some of these “best of’s” next year in your gardens. They should perform well along Front Range of Colorado and elsewhere.


Monday, June 6, 2022

Is It Too Late to Plant A Veggie Garden?


By Yvette Henson, San Miguel Basin Extension

Timing is critical when planting a vegetable garden, especially in the short-season areas of our state where every day counts to get a harvest.  But what if you missed the recommended planting dates for your area?  Is all hope lost for you to have a garden this year?  The answer is: “It depends”.  It depends on how short your season is, your average summer temperature range and what types of crops you plant.

Correct timing for planting a veggie garden matters- the late planted newly sprouted peas in the background didn't produce by the time hard frost arrived.
 (photo by Yvette Henson)

To make this article easier to understand I want to first define some terms: 

  • “warm-season crops” are crops that need warmer temperatures for seeds to germinate (50-90 degrees F) and for the plants to grow to maturity (around 90 degree days and at least 50 degree nights).  Warm-season crops will not tolerate frost.  
  • “Cool- season crops” need a cooler temperature range for seeds to germinate (40 - 80 degrees F) and will not grow well with extended temperatures above 80 degrees during the day (60-65 degrees F is best).  Temperatures above this may result in the plants bolting (forming a flower stalk and eventually seeds) or in the plants having a bitter taste. They will tolerate frost and in fact, develop better flavor with cold night temperatures.  
  • In general, “short-season varieties” will reach maturity in 80 days or less. 
  • Choose varieties based on the average frost-free growing period for your area as well as your average day time and night time temperatures of your location.  You can find this information at https://wrcc.dri.edu/summary/climsmco.html

Now, back to the question at hand “Is it too late to plant a garden and get a harvest this year?”

It is likely too late to plant and get a harvest of warm-season crops like corn, peppers, eggplants, melons (particularly watermelons).  These also require a long season to mature. Let’s use winter squash as an example.  Winter squash require warm temperatures around 90 degrees during the day and at minimum 50 degrees at night.  They also require around 90-120 days to mature.  Although there are short-season, somewhat cold-tolerant varieties of most warm-season crops that will improve the odds to get a harvest in short-season areas with cool night temperatures, these varieties still need the basic conditions for good growth of warm-season crops.  

A selection of winter squash, both a warm-season and a long-season crop         
(photo by Yvette Henson)


If you have a longish, frost-free growing season with warm summer temperatures, you could still plant and get a harvest of warm-season crops like bush green beans or summer squash.  Most varieties mature anywhere from 45- 65 days. 

These warm-season bush beans mature in about 50-55 days
(photo by Yvette Henson)

If you live in a location with summer day-time temperatures that reach or exceed 90 degrees then is too late to plant and get a good harvest of cool-season crops like lettuce, arugula, spinach, mustard greens, summer radishes, etc.  These are all cool-season crops that may bolt and/or develop a bitter taste in the heat of summer.  You could wait until July or early August to plant quick- maturing, cool-season crops like peas, lettuce, fall radishes, etc.  These will be ready once the cooler temperatures of fall arrive.  

Beaujolais spinach does well planted late to mature in cool fall weather
(photo from Fedco Seeds)


If you live in an area of the state with a short frost-free growing season and cool nights, you may still be able to plant and harvest crops like cabbage, broccoli, turnips, rutabagas, beets, carrots.  Just be sure to check the days to maturity on the packet of seeds, keeping in mind that cool temperatures increase the actual days to maturity.  I have a 100 day growing season and cool night temperatures, so I prefer to plant peas the first of July.  They will be ready to harvest in the cool of fall and will be sweeter.

This 'Early Jersey Wakefield' cabbage is easy to grow and is ready to harvest in 70+ days
(photo by Yvette Henson)

Also, keep in mind that some crops grow best with certain day lengths.  See my previous article titled: "Day Length and Plants". 

This isn’t an exhaustive list for sure and I would love to get the input of experienced gardeners.  In the comments give your growing conditions and crops that you can plant later than the recommended planting times for that crop.


Monday, August 10, 2020

Operation Kentucky Bluegrass Eradication!

Posted by Nancy Klasky, CSU Extension, City and County of Broomfield

The title refers to what I’ve been calling the efforts my partner, Jim and I have been doing to transform our four-thousand square foot, corner lot, turf yard into something that I’m pretty passionate about, Xeriscaping. Some people think this mean “Zero-scaping” but it is anything but.  The word xeriscaping comes from the Latin xero, meaning dry and scape meaning landscape or view. There was a trend not long ago where people would remove turf and have a rockscape. The problem with rockscapes is that they are heat sinks. They just absorb the suns heat raising temperatures around your home and aren’t very attractive. They also accumulate organic debris and eventually just become a weed breeding ground that is challenging to manage. I experienced much of this during my many years of landscaping work . Xeriscaping, on the other hand is creating a garden that relies on your natural climate. I live in a neighborhood where daily I hear sprinklers going off and lawns being mowed, including our own.  A good portion of Colorado’s population moved here from parts of the country that receive a lot more annual moisture than we do.  What people need to realize is that Kentucky Bluegrass is aptly named, and is not suitable for the Colorado’s semi-arid climate where the average annual precipitation is 17 inches.  Compare this to Kentucky who receives between 42 and 52 inches of annual precipitation.   

Raised bed garden 
We started removing turf by solarization to put a raised-bed garden in the backyard two years ago. We did this by laying down plastic and weighing it down around the edges and in the middle. This process takes about 1 to 2 months depending on how warm the weather is. We had some black plastic which worked well, but since then I’ve learned that clear plastic is actually more effective.  We then built our raised beds and surrounded them with mulch. We live in Longmont where city residents can go get free mulch at the city’s limb diversion center. This works great for this type of area. We add more every year since mulch breaks down and actually will improve the soil composition over time.  The next area we removed the bluegrass from was the other side of our backyard where we are installing a patio. We opted for the plastic solarization method here too.  These two areas eliminated approximately 1/3 of the grass in our backyard. We converted our sprinkler system to drip lines for our vegetable and flower gardens which greatly reduced our water usage. 

This summer we started working on the front yard. This area faces southeast with no shade. The grass has to go! I was a bit daunted just thinking about starting this endeavor because we live on a hill and our front yard has slopes in two directions. There is a 3 foot grade going up to the house, and another slope that is not quite as steep going down the length on the street side. I was worried about drainage and how we would create level gardens.  This hasn’t stopped me however because I’m determined to be an example of a low-water yard in a sea of thirsty Bluegrass! 

Future pea gravel border garden. 

I had drawn up plans based on the square footage and what we want to do. Like many Colorado neighborhoods we do not have any yard between the street and sidewalk, so the heat from the asphalt and cement make this area even hotter. We have finished a 5 foot wide section bordering the sidewalk where we have created a pea gravel garden. This is what we did. After the grass was sufficiently dead we tilled the area and mixed in good garden soil to around a foot deep. Then we added a rock sand mix to add much needed drainage for this area. The top has a 2 inch layer of pea gravel and some bigger rocks for interest. Our plan is to include the most drought tolerant plants in this space such as Ice plant, hens and chicks, yucca, agave and cactus.  I had some hens and chicks that I’d kept in a plastic container for over a year and they are the first addition to our new space.  Hens and Chicks thrive on neglect and do not like a lot of moisture.

Pea Gravel Garden Completion and next levels on the way!


My objective when planting in the front yard is to use all native and water wise plants. Plant Select© is a non-profit initiative that was started by Colorado State University, Denver Botanical Gardens and horticulturists to find the very best plants for our intermountain and high plains regions. I’ve been inspired by the many Plant Select© plants that the Broomfield Master Gardener Demonstration Garden has.  Another important piece to my planning is to benefit the native pollinator populations, and the best way to do this is by using native plants. There are some great books and guides to Colorado and western native plants, and the Plant Select© website also offers many great plant ideas for our climate.

One last area we have started transforming from turf to garden is an area of the side yard. We have removed a lot of soil from the areas already mentioned and this is another very sunny and hot area where the grass was struggling and had to be removed. I wanted a large space to plant gourds and so we

Future Pumpkin Patch 
cut the grass as short as possible and laid down cardboard. Then we just started piling all that soil we’ve been removing from garden and the patio areas. We capped the sprinkler head which will be changed to a drip line and by next spring we should be ready to plant some pumpkins and other fun autumn gourds!   

So far we have removed around 1,000 square feet of our 4,000 square feet turf yard in the two years since we moved in. We are far from done. My hope is to have three quarters or more of that Kentucky bluegrass gone from our lives and to save thousands of gallons of water every year by eventually having established native and drought tolerant plants surrounding our home.  After that is all said and done maybe I’ll look into replacing whatever grass remains with a buffalo grass alternative to save even more of Colorado’s precious commodity that is water!


For information see:

Colorado Water Wise

Water Wise Landscape Design Steps

Xeriscape Turf Alternatives

Xeriscape Soil Amendments

Learning More About Xeriscaping

Tuesday, July 28, 2020

Fresh Cut Flowers Bring the Beauty Inside


Posted by: Deryn Davidson, Horticulture Agent, Boulder County

One of my favorite things to do this time of year is make bouquets and flower arrangements from freshly cut flowers out of the garden. Lots of people plant flowers in their vegetable gardens and those common species are great for arrangements. Sunflowers, zinnias, dahlias, marigolds, snapdragons, and even herbs like dill and mint make great material for bringing a splash of garden beauty into your home. Of course you can combine any of those, with flowers from your annual and perennial beds too.

Sunflower, zinnias, mint and dill

There's a good chance that if you cut a handful of flowers from your garden and pop them in a vase, they'll look pretty good, but pro floral design definitely requires technique, practice and creativity. Here are a few tips you can follow to take your garden bouquets to the next level.

THE FLOWERS
1. Cut your flowers early in the morning before the heat of the day sets in.
2. Make clean cuts at an angle with a sharp tool. This allows for better water uptake.
3. Choosing flowers and plant material to combine: larger flowers for mass; tall thin material to create lines and define the shape of the arrangement; fillers to fill in empty spaces.
***Sometimes you'll have an arrangement that is all mass or all fillers, but when starting out look for a variety of shapes and texture to give your design more interest***

THE CONTAINER
This can be anything that holds water. Vases, coffee cans, pitchers, mason jars, you name it! You want to generally match the container to the flowers. Big heavy flowers (ex: peonies) need a container that will visually balance them out and also avoid making the arrangement top heavy and possibly falling over.

THE ARRANGING
I like to spread my plant material out on the table and assess what I have. Then you can start adding pieces to the container one by one and build the arrangement.


Key things to keep in mind as you design

1. Proportion: This is not only about the flowers, but also the container. As I mentioned, find the right container for the flowers you've chosen, but also pay attention to how each flower relates to the others in size. You can start to image your arrangement before you begin to build based on what you see in front of you. You want your container to be about 1/3 the height of the overall arrangement.

2. Balance: You can go with symmetrical, where each side is pretty much a mirror image of the other side. Or asymmetrical where if a line is drawn through the middle of the arrangement the two sides are not mirror images, but they are equally "weighted". Perhaps you have 5 small flowers on one side and 1 large flower on the other to balance things out.


3. Harmony: Look at the colors you've chosen. Are they complimentary (opposite sides of the color wheel like yellow and purple) or perhaps monochromatic (one color).
                                                                        
Sunflowers, zinnias and mint
Bachelor buttons, Engelmann's daisy, dill, larkspur (arranged by Allison Appelhans)

Zinnia, prairie sage, blanket flower, marigold (arranged by Allison Appelhans)

Goldenrod, cosmos, maxmillian sunflowers, salvia, aster, verbena (arranged by Allison Appelhans)
As single flowers start to fade, you can pull them out and either replace with fresh, or simply allow the arrangement to change over the course of the week, freshening water and doing minor rearrangements until it's time to start completely fresh (usually about a week). Hopefully these simple, but beautiful creations will inspire you to bring some of your garden's beauty inside to enjoy!

Thursday, January 30, 2020

Tell Your Garden's Story


By CSU Horticulture Agent, Linda Langelo

Photo credit: Pamela Hubbard, Master Gardener Penn State


Create a journal. Keeping a history of your garden successes, failures, innovative ideas, cultivars, weather or whatever you want to record.  We know what George Washington did because he wrote it down.  Without his journals and those of his predecessors, we would not have a "picture" of gardening techniques and varieties used during their time.  But it is more than that.  His comments and thoughts on what he did.  More importantly, who would be around to tell the story of their gardens?

You don't have to be a fabulous writer.  It's your journal.  If you want to keep track of weather and varieties for your vegetable garden only, you have the freedom to do so.  Most of all, if you are like me, I don't like making the same mistake twice.

I know there are lots of apps and garden programs online to help you with your gardening such as growveg.com with everything at your fingertips.  Some services may be free and some have a cost. However, your garden journal can't be hacked, lost in the cloud or locked on a computer.  You can reach over and pull it off the shelf or out of the drawer without having to remember the login passwords to your accounts.  Ease of access, at your fingertips and within your budget, your own three-ring binder journal.  Remember those?  If you ever sell your home, you have plans and plant names recorded and can make copies to pass along to the next owner.  

If you don't want to use a three-ring binder and create your own journal, there are plenty on the market.  Have an artistic flare?  Do a gardening journal scrapbook and pass it onto the grand kids.  

Here is a suggested short list of what you can record:

  • Vegetable Garden Section: 
    • crop rotation
    • varieties 
    • soil amendments/fertilizers
    • sprays
    • last soil test 
  • Landscape Beds:
    • A plan for each bed
    • Record of established plants and new ones
    • Record of problems in the beds, if any and solutions
    • Different reminders for deadheading or pruning or other cultural care           
  • Seasonal patterns:
    • Record temperatures/precipitation
    • Drought periods/wet periods
    • Disease/insect issues and solutions
  • Seasonal Garden Activities and Techniques:
    • Mulching
    • Weeding and solutions
    • Improvements
    • A new technique such as companion planting/planting techniques
  •  Garden Innovation and Research:
    • Keep a record of your own new ideas
    • Keep articles of other new ideas
    • New plant introductions
  •  Budget Section:
    • Put all gardening expenses including tools, shade cloth, plant supports.
    • Keep all the receipts from the greenhouses, nurseries and other sources.

Friday, May 10, 2019

It's Tool Time!!

Posted by: Deryn Davidson, Boulder County Extension

It's no secret that this spring has been slow to get going and now in my area we've had another stall-out with a week of rainy, cool weather. So, what is an eager gardener to do while they have to wait for plants to wake up and the weather to clear?? Make sure their tools are in good working order so they can spring into action when the conditions allow!!

Just like the gardener, garden tools work hard. They are left out in the elements, dragged through the dirt, hung up wet, shoved in buckets, lost under garden benches, you name it! They get abused. So, if you set aside a little time to treat them right, they will serve you well for years to come.

Now, some might say this is a task for the END of the season when you're cleaning up and putting your garden to bed. I'm sure some people do clean and sharpen everything then, but I know not everyone does. In fact, I know that a lot of people don't do this on any regular schedule at all. Well, like any craft or tradesperson, a gardener's tools are an important part of their work so it's a good practice to make sure your loppers, pruners, shovels, rakes, tiller, mower, etc. are all set and ready to go for a successful season.

Image result for dirty prunersgarden tool maintenance, tools

Pruners and loppers:
Clean your pruners and loppers by taking them apart (if possible) and giving them a good scrub in soapy water. Steel wool will help remove any rust that might have built up. It's not a bad idea to soak them in a dilute bleach and water solution (1:10) to sanitize and then rinse and dry. Once they are thoroughly dry, rub them with boiled linseed oil to give them a protective layer from oxygen and moisture and then reassemble.

Sharpen your tools so that they are easier to use and they make clean cuts. You don't want to risk damaging branches by tearing or ripping them because your pruners didn't quite do the job. There are sharpening stones you can get for your pruners or you can take them to a local hardware store and they will often sharpen them for you. Farmer's Markets often have vendors that will sharper knives and tools so you can look for that option too.

Throughout the season, after you use your pruners and loppers, give them a quick clean. Get the sap, dirt and grime off and store them inside and they will stay in good shape throughout the season.

Shovels, rakes and hoes:
Give these a good clean by knocking, brushing or rinsing off any dirt that might still be stuck on them from the previous year. Shovels can be sharpened so that they are easier to dig with. You're not looking for razor sharp with shovels, but having them "just sharp enough" will make digging those new garden beds and transplanting and dividing much easier. They will also benefit from boiled linseed oil once they've been cleaned and dried thoroughly. 

If your shovels, rakes and hoes have wooden handles it's a good idea to check on those too. Over time they may start to crack, splinter and even break in two. If this happens, you can buy replacement handles and attach them to the head of the tool, rather than buying a whole new tool. For general care and maintenance you again want to give handles a clean, let them dry and rub them with linseed oil.

Tools with motors (mowers, tillers, etc.)
For these tools, you can certainly take them to a small engine shop and get a tune up, or you can check out the operator's manual for details on how to do it yourself. This will generally include changing out the oil, filling with fresh gasoline, changing an air filter, change spark plugs, and sharpen the blades.

Horizontal shot of dirty lawnmower in overgrown grass Stock Photo - 12887206
               
Now that you have everything in tiptop shape and are ready for the season to really start, remember that it is best to clean as you go. That way, many months from now when the leaves start to change and there is a chill in the air, your tool maintenance won't be such a big job and you can knock it out at the end of the season!! I should say, big kudos to those of you who do your tool maintenance early and often!!! To the rest of us, now is a great time too tackle it. Happy gardening!!!

Thursday, August 31, 2017

Chickens in the Backyard

About six years ago, the tiny city I live in Western Colorado approved chickens within the Community Residential Zoning district.  They allowed 6 hens per dwelling unit or up to 12 per lot if more than one dwelling unit.  So my family decided we would get some chickens the following spring.  

Some of the benefits of having chickens in the garden include providing green fertilizer, insect control, compost materials, eggs and food, and psychological benefits of calming and helping with special needs such as anxiety and depression. 1  Maybe that answers why I sit on the back step and visit with the chickens after work J


Here is my daughter with our Cochins-Picture by SLC
My family did our research and wanted chickens that were good layers but docile and didn’t fly.  I remember having various breeds growing up and remembering having to clip a wing so they didn’t fly into trees or off our property.  So I ended up with 6 Blue Cochin hens.  Make sure you get your chicks from a reputable company.  http://articles.extension.org/pages/68696/selecting-birds-for-a-small-or-backyard-poultry-flock

We started them out in the garage with a heat lamp until they were old enough to move outside.  We introduced our Borador dog, that’s a Border Collie Labrador mix, to them every day so she knew they belonged.  So it came time to let them out of the coop to roam the yard.  Well, Izzy the Borador thought that she needed to herd them back into the coop.  So with a little training, she realized we just do that at night.  http://articles.extension.org/pages/68697/housing-for-small-and-backyard-poultry-flocks
Izzy the Chicken Herder
By this time, we were planting our vegetable garden.  Since we have a moderated sized town lot, our garden borders our yard.  So I planted my cold crops or cabbage, broccoli and cauliflower.  My husband and I left for work with the girls wandering around our fenced in yard.  That evening I came home to find nubs where plants had been.  My girls apparently really enjoyed the veggies.  Chickens, like humans, are omnivores, so they need a well-balanced diet.  My scraps from dinner go to the girls.  They are my replacement compost pile.  http://articles.extension.org/pages/68178/basic-poultry-nutrition

So up went some chicken fencing so they can get close to the garden but not into the garden.  The chickens seemed to do a good job eating different insects although they are a little wimpy about new things like when I threw a tomato hornworm at them.  They first ran away, and then finally realized it was food.  The one thing I noticed the first year after the City passed the ordinance was the amount of flies seem to greatly increase.  So we hung a few fly traps near the coop and clean the coop weekly.  Not sure if the food web caught up to the increasing fly population or if other people took steps like us to decrease them.  But they now seem to be under control.  Lime is also another way to control the flies within the coop and helps with others things like disease and ammonia.  http://articles.extension.org/pages/66918/use-of-lime-in-poultry-houses

Having cochins has been great in the sense that they are so docile that there is very little pecking from establishing a pecking order.  However, my sister has several different breeds of chickens and one ended up wanting to be queen of the chickens and picked on everyone else.  My sister also lives in a city that allowed chickens but unfortunately had an uninformed code enforcement officer and city employee.  Apparently someone complained about the egg laying noises and the officer came to take the chickens.  Well, my very large personal fitness trainer brother-in-law said “no you are not taking my wife's chickens”.  The gal at the city said “well you have a rooster”.  “No”, he said “I don’t”.  Her response was: “well, how do you get eggs?”  Lesson here is YES, hens lay without the presence of a rooster.   So, to not deal with the city, the chickens were moved to Dad’s house.  But the mean hen continued to pick on the other two hens and my dad threatened to throw her in a pot.  My sister said no, let me figure something out.  Well, she found chicken goggles that made it hard for her chicken to focus on the other hens.  And it worked so no stew pot for her.  I then had a Master Gardener with the same pecking order issue with her chickens and I told her about the googles.  And they worked for her. 
Here is a picture of Big Bertha with her goggles on.
There are certainly challenges to having chickens.  When we go away, we have someone open and close the coop, give them treats beyond what is in the basic feeder and fresh water 1-2 times a day.  Egg layers need a lot of water available to them.  Of course now and then they get in the garden and do some damage.  And they eggs are not cheaper but wow do they taste good.  We do let them get into the garden in late fall for cleanup.  They enjoy eating the leftover vegetation and any insects left in the garden.
My sister's Chicken, Picture by Linda Gular

Do your homework before you get chickens.  Select the right breed for your purposes and situation or support a local egg farmer.   Practice good research based techniques.  Chickens can pass on some illnesses like Salmonella so wash and read this link. https://source.colostate.edu/dont-kiss-chickens-commonsense-tips-poultry-owners/

By Susan L. Carter, Horticulture Agent and Chicken Momma
CSUE Tri River Area

1 information from Rutgers, M. Brimat, Green Chicken Lady, 2016

Oh, by the way, peach season is wrapping up so go buy some Colorado Peaches today!


Monday, May 12, 2014

Plant Sale in Denver this Weekend!

By Alexis Alvey, Horticulture Agent, CSU Denver Extension

The Denver Master Gardener 9th Annual Spring Plant Sale will take place this weekend, May 17th and 18th!  On Saturday, doors will open early at 8:00am and stay open till 3:00pm.  On Sunday, the sale begins at 10:00am and ends at 3:00pm.   The sale is located in front of the CSU Denver Extension office at 888 E Iliff Ave, Denver 80210, in the northeast corner of Harvard Gulch Park, with the cross-street being Emerson.


The Spring Plant Sale offers a unique variety of heirloom and modern tomatoes, sweet and hot chili peppers, select vegetables and herbs, and annual and perennial flowers.  Denver Master Gardeners have been working hard all spring in the City Greenhouses in Denver City Park, operated by Denver Parks & Recreation, growing almost all of the veggies and herbs available at the plant sale.  It has been a great opportunity and hands-on learning experience for the Master Gardeners.  Working alongside Parks & Rec staff, they began seeding in March and have provided the tender loving care that each plant deserves.  The plants are now super healthy and ready to be taken to your home!  Below is a list of all the varieties being grown by the Master Gardeners.  The remainder of the plants are obtained from Colorado nurseries and helps support the local horticulture industry.


At the Spring Plant Sale, Denver Master Gardeners will help answer any of your gardening questions and will help you choose the best plant varieties for your particular needs.  All proceeds from the sale support the CSU Denver Extension Horticulture Program.


The Spring Plant Sale is a great community event, so make sure to stop by the other booths including Plant-A-Row for the Hungry where you can get free seeds!, the gently-used gardening items for sale booth, the Rosedale-Harvard Gulch Neighborhood Association, and the 4H Kids-Grown booth!  For more information, call 720-913-5270.  The event is rain or shine (or snow!).  Cash only, please.  See you there!