CO-Horts

CO-Horts Blog

Showing posts with label transplant. Show all posts

Monday, April 27, 2020

Transplanting Warm Season Vegetables


 By Sherie Caffey, CSU Extension-Pueblo County Horticulture Agent

     I don’t know about you, but I am so excited that it’s almost time to plant my vegetable garden! I love to grow pretty flowers and interesting native plants, but my veggie garden has always been my favorite. It makes me feel so proud to pick things from the garden and feed it to my family, not to mention there is nothing quite as tasty as home grown produce!

My little transplants under an LED light
     Warm season vegetables such as tomatoes, peppers, and cucumbers can’t be planted outside until the danger of frost has passed. Considering we live in Colorado, this can be quite the guessing game as to when it’s safe to plant. To get a good idea, check out the CSU Extension ClimateSummary for your area. This summary will give you probabilities of having a frost on certain dates in your area. For example, in Pueblo, on May 1, there is a 50% chance the temperature will get down to 32° F. The summary also has a nifty chart that shows you when to plant which crops based on normal temperatures. Although we don’t know what the weather will bring, this is a good resource to help you take your best guess.

Getting my little plants used to the great outdoors
     Even when the danger of frost passes, you shouldn’t just stick brand new transplants out into the garden without giving them some time to get used to being outdoors. I like to start my new plants outside for 10 minutes, and bump it up every day until they can handle being out there for hours.

My garden beds after adding new compost
    Another thing you can do if you still have some time to wait before you can plant some of your vegetables, is to make sure your soil is ready! I have relatively new garden beds so I added a few inches of compost to my beds and incorporated that a couple inches into the existing soil. This will add organic matter and hopefully give me a bountiful harvest.

     To get in depth information on when to plant a certain vegetable, spacing, germination days, days to maturity or really anything else check out this Vegetable Planting Guide from CSU Extension.  

Tuesday, February 3, 2015

Are you a SAD (Seed Acquisition Disorder) Sufferer?

Kurt Jones, Chaffee County Extension Director


I got another seed catalog in today’s mail to go with the multiple email requests that I have also received this week.  These companies like to prey on gardeners like me who want to try out new seeds.  (S)He who dies with the most seeds wins, right?

One “cure” for the winter blues suffers amongst us is to begin planning (not planting, yet) for starting seeds indoors for transplanting outdoors later.  It's also a good way to grow certain varieties of plants that are not readily available as transplants in the nursery. 

Some problems occur, however, when you grow your own transplants. Many homes are too warm and have inadequate light, resulting in soft, spindly and pale seedlings. Sturdy, healthy seedlings are grown under high light intensities and fluctuating temperatures (warm days and cool nights). For example, desired daytime temperatures may be 70 to 75 degrees and nighttime ones 50 to 55 degrees depending on the species. 

One answer is to construct a special hotbed/cold frame structure. Using an unheated basement or other cool room, and adding solid warming cables and artificial light also works.  A combination of incandescent and florescent lighting is preferable. 

"Damping off" is another problem that often plagues seedlings. It is a fungal disease, caused by one of several soil-born organisms. Damping off may prevent seed germination altogether by plugging up the conductive tissue of a developing seedling. Seeds may be killed just as they are approaching full development. Using pasteurized soil or a soilless mix can help you avoid this problem. Providing correct temperatures, correct light and avoiding over watering are also beneficial. 

Novice Gardeners often plant seeds too early, in hopes of having large transplants. Unfortunately, these giants often develop growth and production problems. The transplanting procedure shocks plants. They have the best chance of recovering quickly when they are smaller rather than larger.

Ideally, transplants (ex: tomato, peppers) should be about the diameter of a pencil when transplanted.  Many purchased transplants are much larger than this, and may take more time to get established in the garden.

To grow transplants of the appropriate size, decide when you want to plant them outdoors. Find out the seed-to-transplant time and add seven to ten days for hardening off. Backtrack the total amount of time from your desired transplanting date and you have arrived at the seed planting date. For example, let's look at peppers. The goal will be to plant hardened-off pepper plants outside May 30 (two weeks after the “frost free date”). It takes 8 to 10 weeks to grow a pepper transplant, so that would be (using 10 weeks) March 21. After including 10 days for hardening off time, the planting date becomes March 11. 

Hardening off is the next step. This process prepares the transplants for outdoor conditions and plants will struggle if not subjected to it. A few days before "hardening" starts, reduce the amount of water plants receive, but don't allow them to wilt. To harden, begin by putting plants outdoors in a protected area for a few hours, then bring them back in. During the next ten days, gradually increase the amount of time they are outside and increase their exposure to wind and sun. After they've experienced several days of 10 to 12 hours outdoors, leave them outside 24 hours a day for a couple of days. 

Well, I’m not sure this is necessarily a “cure” for SAD, but it is sure fun to begin some plants indoors.  For now, I will just collect the catalogues, because (s)he who dies with the most seed catalogs DEFINITELY wins!

Wednesday, April 23, 2014

Sixty Second Secrets for Gardening Success: Buying Transplants!


Today on Sixty-Second Secrets for Gardening Success: Buying Transplants!

When selecting transplants from the nursery or garden center, be sure you pick the best plants available. Plants should be a healthy green color, with a wide bushy form. Avoid buying leggy or stretched plants. Look for any signs of disease, insects, or damage to the plant before you bring it home.

Plants that are over watered in the nursery are often shallow rooted. Check the roots by pulling the plant out of its pot or container. Also check for pot bound or girdling roots before you purchase a plant.

Once you get your plants home, you will want to harden them off by placing them outside in the sun. Gradually increase the amount of time the plants spend out in the elements each day for a week prior to planting to acclimate them to their new environment.

For more information on gardening, contact your local
CSU Extension Office.

Sixty-Second Secrets for Gardening Success is a production of
Colorado State University Extension.
CSU Extension: Extending knowledge, changing lives.

Thursday, February 28, 2013

Want to grow your own transplants? Well it is almost time to start

If you are anything like me, then the winter doldrums have set in. The recent snow along the Colorado Front Range has lifted my spirits a bit with the promise of drought relief, but I am still anxious for spring. And all of those seed catalogs jamming my mailbox are not helping. Yet it is precisely those catalogs that initiated this post.

Meanwhile, back at your local wholesale greenhouse, the growers are busy sowing, germinating, transplanting, and growing bedding plants for your garden. And with any luck, they will have a grand selection of vegetables and blooming plants for your garden. However, if you want something different or just want the fun of growing your own transplants, it is now time to get started.

Growing your own transplants is not hard nor does it have to be complicated. But there are a few points that you need to remember to be successful.

Choosing the right seed


As spring approaches, the seed racks in most retail shopping centers will start to appear. Of course, most will be very generic with your standard selections of popular tomatoes, peppers, cucurbits, assorted herbs, and flowering plants. Unless you are shopping in an independent local retailer, you are probably only going to find a list common to most locations in the nation or region if you are lucky. It will not be until you shop at a local independent vendor will you find a seed selection with varieties better suited to your specific location. Also, many retailers ignore the fact that the seed inside these packets are living organisms and place the racks in a brightly lit, sunny spot or right smack dab in front of the door, which exposes the seed to drafty blasts. So my advice is to buy your seed from a retailer that specializes in garden plants and make sure that the seed is fresh and packaged for the current year.

One of the many advantages of ordering your seed from a seed catalog is the opportunity to choose different and unique varieties. From the many mail-order (online for you internet geeks) seed companies, you can choose many different varieties heirloom, organic, unusual, rare, or just plain hard to find selections. One of my favorite finds has been the Naga Bhut Jolokia pepper, but that is another story. When I browse and make my annual seed selections, I often choose what sounds fun and has a potential in my kitchen. Make sure that you pay attention to the days to harvest, plant size and other environmental needs, but I typically am willing to try just about anything. Don't be afraid to experiment.

Now that you have your treasures, it is time to think about starting your transplants. Here is where you can show off your gardening skills, even if you don't have any. The key factor here is cleanliness. Here are some of my dos and don'ts:

Do 


Use only clean fresh germinating mix. When choosing your germination substrate you always get what you pay for. Buy the good stuff. Make sure that it is mostly sphagnum peat moss with vermiculite or perlite.

Don't 


Do not use garden soil or leftover potting soil from another project. These are likely contaminated with damping off diseases. Yes I know you can cook it in the oven, but save your oven for cookies. I also only buy small bags. It is easier to keep your germinating mix clean by keeping it closed.

Do

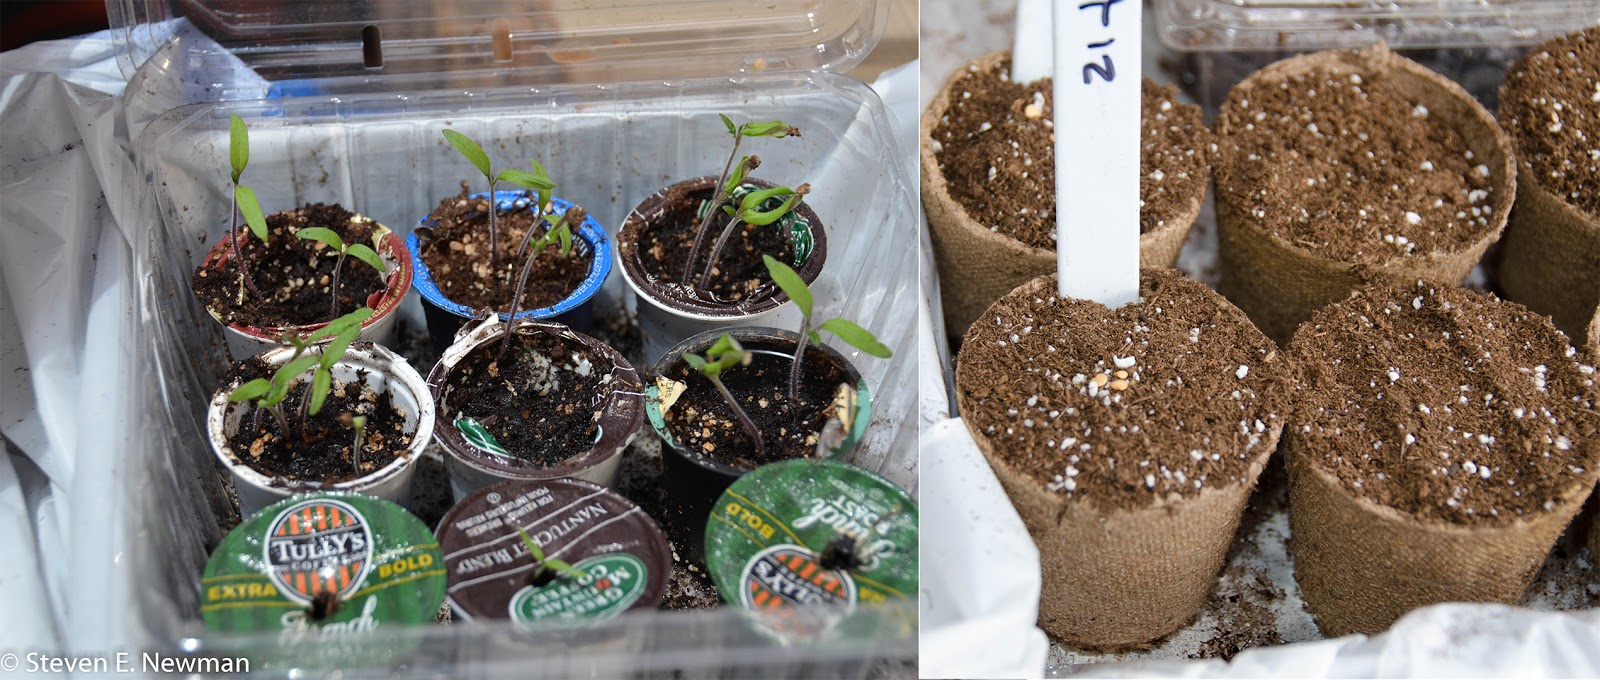
Use clean containers. I like to use the clam shell containers that fresh berries are packaged. They are clean, have drainage, and are instant miniature greenhouses. Ideal for the intense recyclers in the house. To wet the germinating mix, I prefer to add water from the bottom up. I use a mortar mixing tub, but you can use anything that you like, just keep it clean. Uniform moisture is crucial for successful germination. You can keep your germination mix moist with a mist bottle (rinse out the window cleaner please) until your seeds have sprouted and have started to form leaves.

Don't 


Avoid old and dirty flats. You can re-use flats from earlier seasons, but make sure that they are scrubbed and sanitized. You can mix some regular household bleach with water (1:10) for a nice disinfectant. Make sure that your containers have good drainage.

Do 


Choose a warm space for your seed near a sunny window. Most seed needs to be sown and started four to eight weeks before your transplant date. Choose a sunny spot. Bright light is crucial to many cultivars. Read the instructions on the seed pack.

Don't


Starting too soon can result in tall and weak seedlings. If you are energetic and willing to make a small investment, artificial light may be in order for you. A simple shop light with fluorescent bulbs is more than sufficient for many applications. However, if you plan to grow your own transplants for many seasons, don't be afraid to invest in a quality grow lamp. You can find these at most independent garden centers or specialty grow shops.

Do


Transplant your seedlings on schedule. Overgrown seedlings are a pain to transplant and separate. Your seedlings will grow faster and be stronger with proper transplanting. Make sure your seedling mix is moistened before you transplant.

Don't 


Many beginning gardeners make the mistake of using too big of a container for transplanting. In this case, smaller is better. I prefer peat pots, but you can also use just about any container. as long as it is clean. The k-cups with the new single cup coffee makers are perfect. And no, don't grow in the old coffee grounds, Coffee grounds are better when composted.

When the last danger of frost is present, starting to harden off your transplants by gradually exposing them to out doors. Make sure that you don't allow them to wilt, but they will harden off more quickly if you allow them to dry a bit with reduced watering. I am always anxious for spring and often put my plants out too early. Some times I get an early harvest, but sometimes I lose. If you grow your own transplants, you can move a portion out and save some in reserve.

For more information on growing your own plants from seed, please see our Fact Sheet at:

http://www.ext.colostate.edu/pubs/garden/07409.html

Steven E. Newman, Ph.D., A.A.F.
Greenhouse Crops Extension Specialist and
Professor of Floriculture

Floriculture and Greenhouse Crops Extension