CO-Horts

CO-Horts Blog

Monday, November 28, 2022

Plant and Insect Diagnostics: Always Something New to Learn

Post by: Lisa Mason, Arapahoe County Extension

My colleagues and I hosted a plant and insect diagnostic workshop in October, a collaboration with CSU Extension and the Plant Diagnostic Clinic at the CSU Spur campus in Denver. About 45 Extension staff and Master Gardener volunteers gathered to build relationships, and learn more about plant pathology and insects. Even though I taught a portion of the workshop, I am always humbled to remember the more I learn, the more I realize I don’t know. For instance, I 
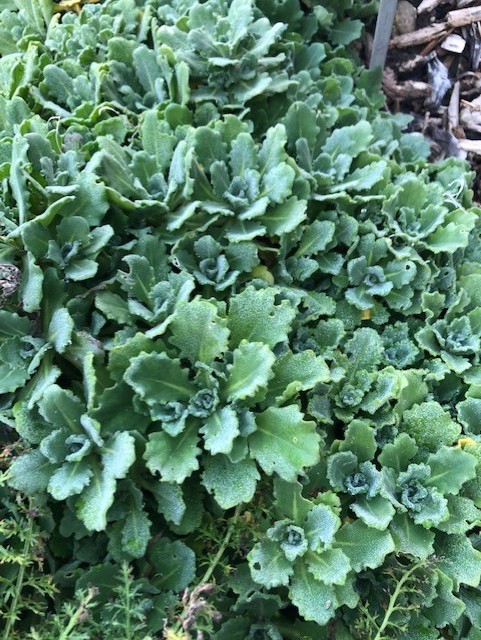
learned that we have a weedy species of bluegrass (Poa trivialis, rough bluegrass) that can be fairly common in lawns. When the weather heats up, this type of bluegrass goes dormant. The grass turns a slightly purple color before turning brown. This is a great reminder that it is so important to know the plant identification before solving the problem. Brown spots in lawns often are caused by gaps in the irrigation systems, but it’s worth identifying the grass species to see if it could be rough bluegrass. The solutions for irrigation gaps and removing a weedy species in the lawn are entirely different. Overall, the biggest take-home message from the workshop was a reminder to understand the big picture of the plant in the landscape before 
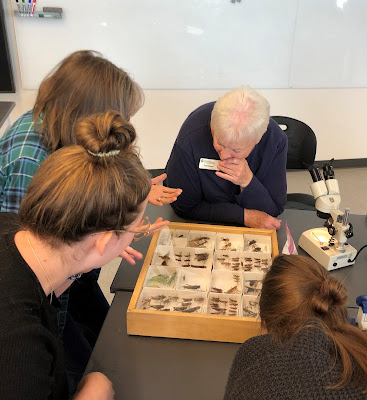
making any judgements or diagnoses.

Diagnostic workshop participants examine insects in the Orthoptera order (grasshoppers, crickets, and katydids). Credit: Lisa Mason

What exactly are plant and insect diagnostics?

Extension offices around the state receive a broad spectrum of questions at the Extension office varying in topic, need, and complexity. Some examples of common questions include: How do I get a soil test? Is emerald ash borer in my county? What plants do you recommend for low-water/xeriscape garden? Why do I have brown spots in my lawn? Which disease does my tomato plant have? Why is my tree struggling? Are insects harming my plant?

Plant and insect diagnostics differ from many other questions because the plant needs a diagnosis which requires understanding environmental context clues in addition to the signs and symptoms present on the plant. While this might sound easy, the process of diagnosing a plant issue can be very complicated! Consider when you go to the doctor for a medical diagnosis for a persistent fever. A wide variety of bacterial and viral infections, and other ailments could cause a fever. A doctor will ask you questions to understand the bigger picture and look for clues. Depending on the answers, the doctor may choose to run some tests. Test results will further inform a diagnosis. Plant diagnostics is similar. Perhaps you have a plant with brown leaves. Those brown leaves could be a symptom from a number of environmental factors like drought stress or root damage. Perhaps a bacterial, viral, or fungal pathogen is causing brown-colored leaves. In some cases, maybe insects could be causing the damage to the plant.
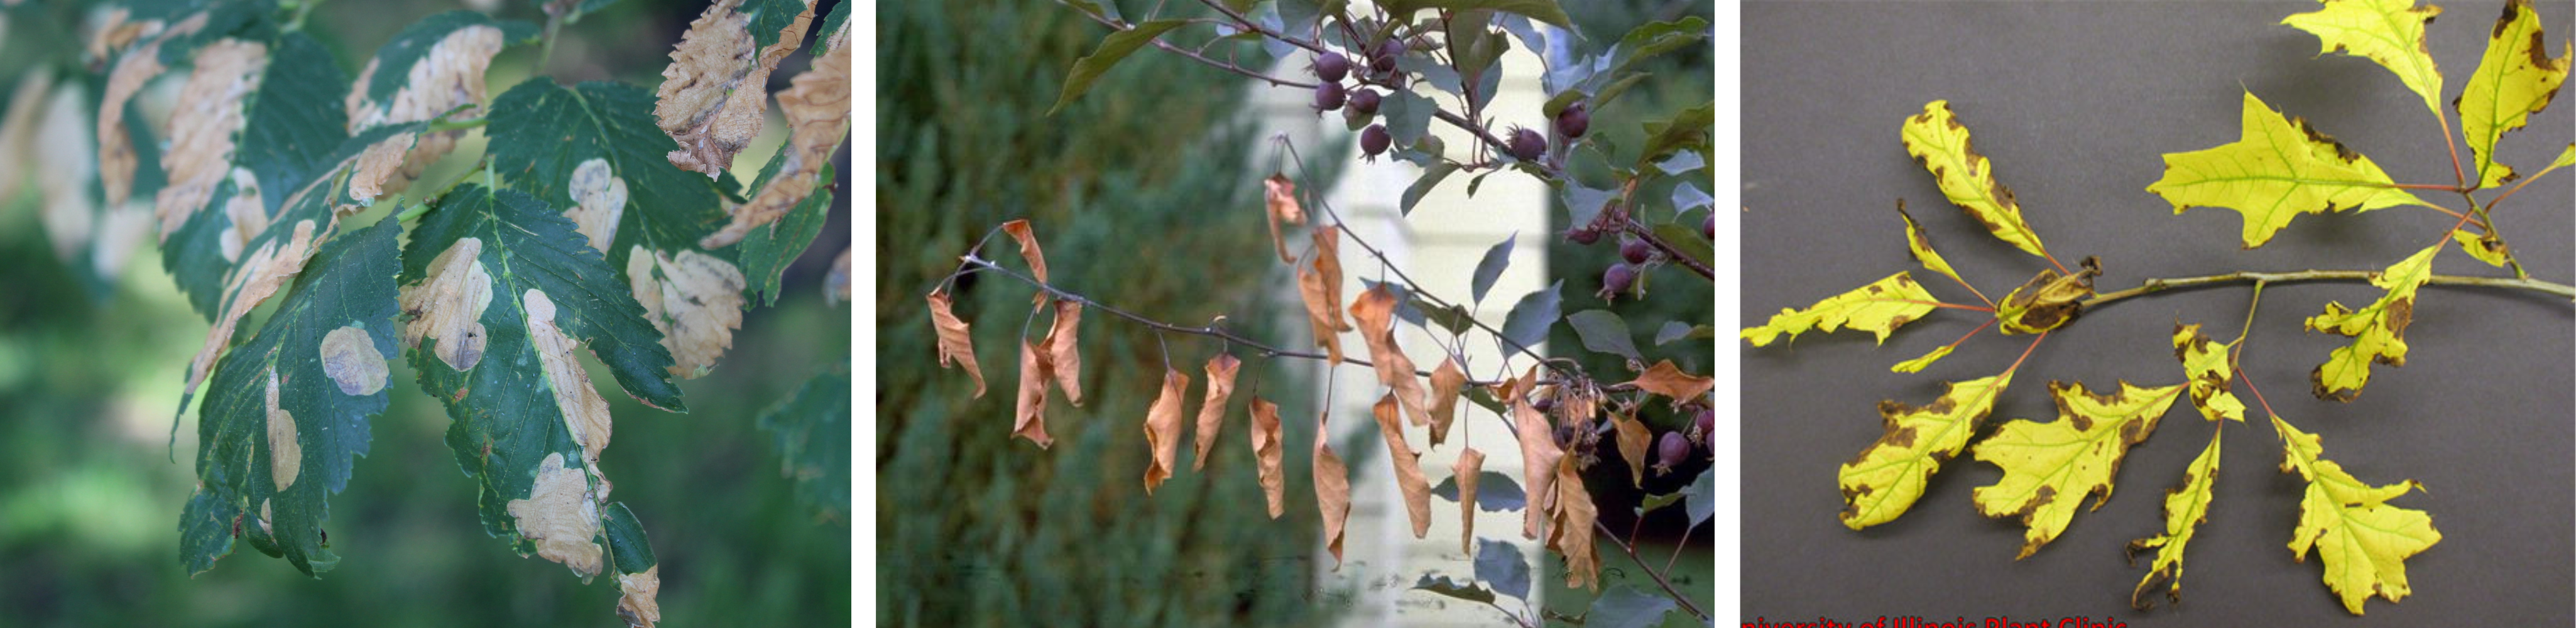
Three different causes of “brown leaves.” Left: Elm leafminer, a sawfly that feeds within elm leaves creating brown patches. Center: fire blight, a contagious bacterial disease affecting plants in the Rosaceae family. Right: Severe iron chlorosis, an abotic or environmental condition where the plant can’t uptake iron from the soil. Photos: Lisa Mason, William Jacobi, CSU, Bugwood.org, and University of Illinois Plant Clinic.

When you submit a plant or insect sample for diagnosis, be prepared to answer questions! Here are some of the most common questions you’ll be asked after you submit a plant sample:

  1. What do you need answered?
    • Identification
    • Diagnosis and management recommendations
    • Identification and control advice
    • Other
  2. Do you have photos of the plant? Please submit photos up close of the damage and also far away from the plant to see the entire plant in the landscape?
  3. Do you know the identification of the plant?
  4. Where is the plant growing? (e.g. raised bed, next to the house, in the lawn, etc.)
  5. How much water does the plant receive? How is the plant watered?
  6. Do you apply any products (fertilizer, pesticides, etc.) to the plant? What products and how often?
  7. Describe the issues and any observations you’ve noticed.
  8. What part of the plant is affected? (e.g. leaves, trunk, branches, fruit, etc.)
  9. When did you first notice the issue? Are nearby plants affected?
  10. Has anything changed in the environment recently?

A Master Gardener, CSU Extension staff, or Plant Clinic staff will likely have additional questions depending on if the plant sample is a tree, lawn, vegetable, other plant, or insect. All these questions help inform the next steps for diagnosis and management recommendations.

Where do I submit my plant sample?

You have options! CSU Extension and the Plant Diagnostic Clinic partner together to ensure you get an accurate identification and/or diagnosis. When you have a question, or when you bring in a plant or insect sample to your local county Extension office, we make sure to find the right expert to identify and/or diagnose the issue. Depending on the nature of your question or sample, your question may be answered by Master Gardeners, Extension staff or specialists, or experts at the CSU Plant Diagnostic Clinic. Please note some local counties may have a fee and the CSU Plant Diagnostic Clinic has sample fee. Ask your local county office if there is a fee. Click here for the CSU Plant Diagnostic Clinic fees.

Learn more about plant and insects

Land grant universities like Colorado State University have a long history working on plant diagnostics (Iles et al., 2021). If you are interested in learning more about nationwide plant diagnostic efforts, check out the National Plant Diagnostic Network.

Challenges with plants can often be avoided with the right care practices. Learn more by taking classes through CSU Extension on variety of topics related to plants, insects, gardening, and more! Check your local county office, the free webinars on the CO-Horts Blog, or Green School which includes the Colorado Master Gardener program.

What is CSU Spur?

Have you heard of the brand new CSU Spur campus? If not, you’ll want to learn more! Spur is a brand new campus located within the National Western Center in Denver. This campus is open to the public and is worth the visit to see the state-of-the-art research and education facility from art installations, to veterinary care, equine therapy, and more.

The CSU Plant Diagnostic Clinic is now open at Spur! This is the Colorado state lab in the National Plant Diagnostic Network. They offer services such as plant disease diagnosis, insect identification, plant identification, and recommendations.

The Soil, Water, and Plant Testing Laboratory will also be opening at the Spur campus. Stay tuned for their opening date. 

An earth-friendly holiday tradition


Posted by: Todd Hagenbuch, CSU Extension, Routt County

The holidays are upon us, and for many, with that comes the age-old tradition of putting up a tree. One of my favorite family traditions is going with my wife and kids on a nice day or moonlit night and scouring the hillsides for a perfect tree, always excited to have the smell of evergreen once again filling our home. I've written about this tradition before, but as we just completed this task yesterday, I can't help but talk about it again.

Live trees are often the choice of horties, no matter how you get the tree. If you’re going to buy a live tree from a local vendor, you have a lot of options to choose from, with size, species, and price all being considerations.  These trees, typically grown on family-owned tree plantations around the country, are part of a sustainable, green industry. 

Two trees felled...and one daughter
about to be!

When you go to a tree retailer, make sure to choose a fresh tree. A fresh tree will have a healthy green appearance with few browning needles. Needles should be flexible and not fall off if you run a branch through your hand. Raise the tree a few inches off the ground and drop it on the butt end. Very few green needles should drop off the tree. It is normal for a few inner brown needles to drop off.

If you don’t want to buy a tree at a lot, you might consider going out and cutting your own tree like my family does.  The USDA Forest Service (USFS) sells permits for $10 per tree, and a family can purchase up to five permits. Likewise, the Bureau of Land Management (BLM) typically sells permits for between $6-$10 per tree depending on location, and may allow you to cut up to 3 trees.  Permits from either agency can be purchased at your local district office.  Note that certain areas of the forest are off-limits for cutting trees including many recreation areas, within 100’ of roadways, and all wilderness areas. When you get your permit, make sure to discuss with your local office what the rules are for your area. Also, remember that private property is just that: private!  Don’t enter private land unless you have explicit permission to do so, even if the perfect tree is within sight.

Cutting the tree is easiest as a two person project. The "cutter downer" usually lies on the ground while the helper holds the bottom limbs up. While the cut is being made, the helper should tug on the side of the tree opposite the cut to ensure that the saw kerf remains open, keeping the saw from binding. 

Regardless of whether you are cutting on public or private land, try to choose trees that are in a clump and not single trees in the open to help with forest management objectives. Don’t ‘top’ trees, avoid cutting trees over 20’ tall, and make sure to cut within 6” of the ground so the resulting stump doesn’t create a hazard. 

One tree for us and one for Grandma
and Grandpa, ready to be loaded and
taken home.
Before the tree comes inside, cut 1 ½ inches off the bottom of the tree and immediately plunge it into a bucket of water.  Otherwise, sap will seal the bottom of the tree and keep water from entering.  Have your tree stand ready, and work quickly so you can get water back in it right away.  Trees take about 1 quart of water for every inch of diameter of the trunk, so be prepared to water the tree several times each day.  Remember that if it goes dry, the sap can reseal the trunk.  Also, to help keep the tree fresh, keep it away from heat sources and out of direct sunlight.

When the holidays are over, give your community and the environment a holiday gift by recycling your tree. You can mulch it for use in your own yard or contribute it to a community-wide chipping program, enabling you to enter the New Year with a clear conscience that you’re helping the environment and completing the life-cycle of the tree. 

Happy Holidays and happy tree decorating from all of us at CSU Extension!


Monday, November 14, 2022

A Comparison of Two Broccolis and their Side-shoot Production

 By Yvette Henson, San Miguel Basin CSU Extension

Since 2011, San Miguel Basin CSU Extension Colorado Master Gardeners have grown different crops under different covers in our High Altitude Season Extension (HASE) research trials.  We want to know which covers, if any, extend the season and improve yield and quality for whatever crop we are growing that year.  Another goal of the HASE research beds is to find varieties that perform well in our short and cool summer growing season. 

In 2016, we grew 3 varieties of broccoli under 3 different season extension covers and a ‘control’ (no cover).  We chose varieties that would continue to produce side shoots after the main head had been harvested.  Out of the 3 varieties we chose, ‘Solstice’, ‘Umpqua’ and ‘Nutribud’, ‘Nutribud was our favorite because it had the best yield, flavor and nutrition.

Yield of Broccoli
2016 HASE Broccoli Trials
This year, I grew broccoli in my home garden.  When I was planning my garden, I didn’t know if I still had seeds for ‘Nutribud’, so just in case, I bought some seeds at the garden center of the variety ‘Belstar’, an F1 hybrid. (For this blog what matters is to know that seeds from hybrids usually don’t produce plants that are ‘true to type’)  The seed packet said that ‘Belstar’ would continue to produce side shoots after the main head was harvested.  That is what I wanted- I care more about getting an extended harvest through the season than a single harvest of large heads.  After all, I cut them up to prepare them to eat, don’t you?   And since broccoli is a relatively big plant, I wanted to get as much food out of the space they take up as possible. 

‘Nutribud’ broccoli is an open pollinated variety.  (If you save seeds from an open pollinated variety grown correctly, the next generation of plants from those seeds will come ‘true to type’.)  Dr. Alan Kapuler de-hybridized a hybrid variety called ‘Pacman’ and named it ‘Nutribud’ because in a UC Davis test on nutrition in different broccoli varieties, 'Nutribud' came out highest in free glutamine, a building block of protein: good for the brain and healing for the body!

'Nutribud' broccoli head, 2016 HASE Trials, early August 2016.
Turns out, I did have seeds for ‘Nutribud’ at home so I decided to plant 4 plants of each variety.  3 of the ‘Nutribud’ plants produced full-sized heads at the end of July.  The 'Belstar' broccoli produced full-sized heads by mid-August and both varieties continued to produce side shoots until killing temperatures at the beginning of November. 

First 3 heads of 'Belstar' broccoli
and the second side shoots of 'Nutribud' broccoli, etc.
August 15, 2022.
What blew my mind was the difference in size between the side shoots of the 2 varieties.  ‘Nutribud’ continuously grew bite-sized side shoots from the axils in the leaves after the heads were cut.  However, the ‘Belstar’ plants produced head-sized side shoots from large side branches!  I was amazed because none of the other varieties that we grew in 2016, produced side-shoots the size of broccoli heads!  They all produced smaller shoots, like the ‘Nutribud”. 

'Belstar' side shoot (left) & 'Nutribud' side shoots (right)
September 13, 2022
I didn’t do a thorough job weighing each harvest, especially at the beginning, so I don’t have data to show which variety actually produced the most edible broccoli, but it was close.  I could harvest many 'Nutribud' side shoots weekly but it took several weeks for the 'Belstar' side-shoots to grow to their larger size.  

Last harvest of 'Belstar' side-shoots (bottom)
and next-to-last harvest of 'Nutribud' side shoots (top)
October 21, 2022
An advantage of the ‘Belstar’ would be for gardeners or farmers who want to produce 'heads' over a longer period of time.  The advantage of 'Nutribud' would be nutrition.  I personally love the flavor of 'Nutribud' plus the shoots are very tender.


Tuesday, November 8, 2022

Evergreen Perennials


Just as we need to settle into the increasingly shorter days and colder nights, we also need to adjust to the bleak landscapes brought on by winter. Annuals die, perennials die-back, and woody plants lose all their leaves, leaving a bleak landscape, indeed! Yet, amidst all this barrenness, there are some plants that stand out, full of color and life: the evergreens! We’re all well aware of the various evergreen trees that fill our Colorado landscapes, but how well do we know the evergreen perennials that dot those same landscapes? Here’s a few to take note of this winter:

Arabis caucasica (Rock Cress) is a low-growing, creeping evergreen that sometimes takes on a mounding habit. This plant prefers sun and can adapt to various moisture levels. In the early spring, Arabis caucasica features a profuse, mass flowering of delicate, white blooms. The foliage is fairly unique, often hairy with a toothed margin, and provides a nice splash of texture and color throughout the winter. 

Arabis caucasica in late fall. Photo by Hania Oleszak.

Armeria maritima (Sea Thrift) is one of my personal favorites. The evergreen foliage appears grass-like and persists throughout the winter. In the early summer, the cutest clover-like flowers bloom on leafless flower scapes. This whimsical plant is quite hardy, doing well in sunny, dry, and salty environments. 

Armeria maritima in late fall. Blooming occurs in early summer, but can continue flowering if deadheaded (even into the fall!). Photo by Hania Oleszak.

Cerastium tomentosum (Snow-in-Summer) is an aggressive, evergreen ground cover. This plant prefers sunny, dry conditions and can do well in poor soils. Cerastium tomentosum features white flower blooms in the early summer and textured, hairy, grayish foliage in the wintertime. 

Cerastium tomentosum in late fall. Photo by Hania Oleszak. 

Delosperma nubigenum (Yellow Ice Plant) is a low-growing, semi-evergreen succulent that is being bred for greater cold hardiness. Preferring sunny and dry conditions, Delosperma nubigenum is often found in rock gardens. In the summer, this plant features a mass flowering of yellow flowers; in the winter, the jellybean-like leaves take on a purplish tinge as the cold sets in.

Delosperma nubigenum in fall; note the red/purple tinge coming on. Photo from Conservation Garden Park. 

Iberis sempervivens (Evergreen Candytuft) is a low-growing, spreading evergreen. It prefers full sun to partial shade and is adaptable to various moisture levels. In the spring, Iberis sempervivens features blooms of white or pink flowers, and can potentially have secondary blooms in the fall. In the winter, Iberis sempervivens provides a nice texture to the landscape through its linear, evergreen foliage.  

Iberis sempervivens foliage. Photo from Oregon State University.

Do you have a favorite evergreen perennial? Let us know below!

Wednesday, November 2, 2022

Deadly Plants: The Castor Bean

 Posted by: Alison O'Connor, Larimer County Extension

Castor bean (Ricinus communis) is a tropical beauty native to east Africa that is extremely showy, but also incredibly poisonous. It’s commonly planted in the landscape as an annual to provide structure, color, and texture. I first met castor bean during a family vacation in northern Minnesota as a young teenager – more on this later.

Castor bean leaves and seedpods

In frost-free climates, this semi-woody plant can grow up to 40 feet tall, but in Colorado, you can expect annual growth of up to 10 feet. It won’t survive temperatures below 32 degrees. It’s an absolute garden showstopper with vibrant red, pink, or green seedpods that are spikey and persistent in late summer. Leaves are star-shaped and up to 18 inches across on long petioles. The Latin Ricinus translates to “tick”, as the seedpods are said to resemble blood-filled ticks. The seeds are small and look a little like black-eyed peas.

Large, showy leaves of the castor bean (no, it's not THAT plant)

The plant is in the Euphorbiaceae family (think poinsettias and spurge), so there will be milky sap with any broken plant part. Those with allergies to latex may have reactions to the sap, so wash your hands and wear gloves when handling the plant.

But the sap really is a minor issue when it comes to poisonous nature of this plant. The seeds are filled with ricin, one of the world’s deadliest natural poisons, a blood-coagulating protein. Ricin is an estimated 6,000 times more poisonous than cyanide!

Castor bean seeds [photo from ebay.com]

Back to northern Minnesota…

My brother was a budding horticulturalist (and still is!) and he came across this plant during our trip. Some kids collect rocks, but Jeffrey collected plant parts and seeds. Not knowing what it was, he picked off a few of the seeds, put them in a black plastic film canister (remember those?!), and brought them home.

We had a beagle mix named Bosley growing up. He was a great dog but an absolute food hound. What Bosley consumed was legendary – entire loaves of bread, charcoal from the grill, two pounds of Starlite mints, mouse traps baited with peanut butter, an entire jar of peanuts – he ate anything and everything. He was a counter surfer and was known to steal boiling hot French fries off the oven tray.

Sweet Bosley - look at that face! His obsession for food was legendary.

A few months after our trip “up north”, the film canister was knocked off Jeffrey’s dresser, ended up on the floor, and sweet hungry Bosley ate some of the seeds. And he got really, really sick. Our family vet, Dr. Fred, suspected that he ingested something poisonous and eventually we figured out the puzzle, but only after we had the seeds identified. None of us realized how poisonous the seeds were (4-8 seeds can kill an adult human). Boz was in tough shape in ICU and we were all nervous wrecks.

Fortunately, with the help of the University of Minnesota Veterinary Medical Center and their toxicology lab, Bosley survived. His legend lives on since Dr. Fred wrote up a scientific publication about his treatment for him – Boz has a refereed publication! I remember picking up Bosley from the vet. He was a bit sluggish and a little worse for wear but recovered in time…and continued his quest to eat anything and everything his entire life. Fortunately, there are now antidotes available for any accidental poisonings that occur.

Interestingly, the poison ricin is being investigated as an anti-cancer agent – another common name for castor bean is “Palm of Christ”. And maybe you took castor oil to help you with heart burn or constipation? Don’t worry about being poisoned. Ricin is water soluble and is not released during the pressing process.

Castor bean really is beautiful!

The plant grows easily from seed (just limit how many you purchase online to avoid the watching eyes of the FBI) and needs regular water in the summer. But just heed caution when it flowers and produces seed. If you have young kids or hungry dogs in the landscape, it’s best to admire it in photos instead.