CO-Horts

CO-Horts Blog

Wednesday, October 25, 2023

Ripening Tomatoes Indoors

by Denyse Schrenker, CSU Extension, Eagle County

The temperatures are consistently below freezing at my house and I am ready to put my gardening tools up for the season. Now I need to decide what to do with all of my unripe tomatoes that have been stuck in purgatory for most of October; not progressing under their frost blankets but also not dying. I can only handle so many fried green tomatoes and green tomato relish and salsa so I sort my tomatoes into those that will ripen off the vine and those that will not.


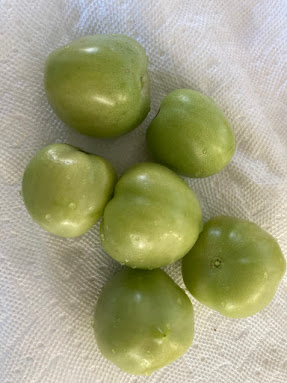
Some of the green tomatoes I separated for relish.

Tomatoes that are starting to develop a pink blush will ripen off the vine without any loss of flavor; this is called the breaker stage. Tomatoes that are a shiny green and have a white to light green star shape on the blossom end of the fruit have reached the mature green stage. These fruits will ripen off the vine but their flavor will not fully develop - a small sacrifice I am willing to make to eat fresh garden tomatoes well into November. Tomatoes that are a more matte green have not reached the mature green stage and will not ripen off the vine, these tomatoes can be used for green tomato recipes.


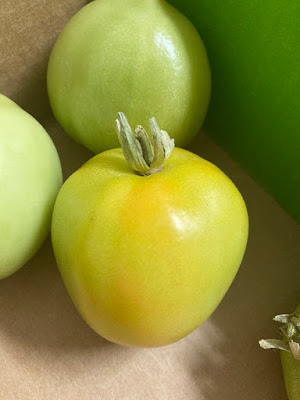
Tomato starting to develop blush color.

Once I have separated out the tomatoes I want to ripen, I remove any stems and wash and air dry the fruit on a clean paper towel out of direct sunlight. The dry tomatoes are then placed in layers 1-2 tomatoes deep in a covered box or a container with newspaper or cardboard covering them. I keep them in a dark cool location out of direct sunlight to ripen. Store the tomatoes at a temperature between 70°F and 55°F. Tomatoes stored closer to 70°F will ripen in a couple of weeks and tomatoes stored closer to 55°F will ripen in about a month. Tomatoes ripened below 50°F will be bland.


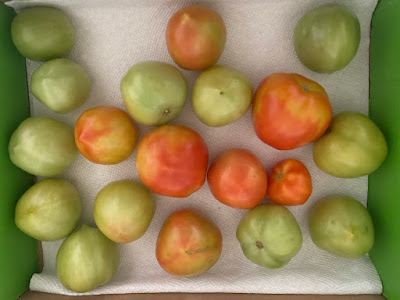
Washed, dried and ready to store for ripening.

Humidity can cause issues when ripening tomatoes indoors. Too much humidity causes the fruit to mold and too little humidity causes the fruit to shrivel. I typically have more trouble with too little humidity. To help increase the humidity, the tomatoes can be placed in a strainer or blanching pan and then placed in a covered container with water at the bottom. Make sure the tomatoes are not touching the water though. I check the tomatoes every couple of days and remove tomatoes that are ripe or nearly ripe. If I want the tomatoes to ripen more quickly I will add a banana or one or two red tomatoes to the green tomatoes.

Ripening tomatoes indoors does not need to be reserved for last ditch end of the season efforts! I try to pick most of my tomatoes when they develop that light blush color. I find that I get better yields harvesting them at this stage and then ripening indoors because I do not lose as many tomatoes to sunscald, critters, or simply missing them before they become over ripe. It may be the end of the gardening season but I am looking forward to having tomatoes all through the fall!

PlantTalk: Ripening Tomatoes Indoors

Thursday, October 5, 2023

How to Squirrel-Proof Your Bulbs

 by Angela K. Nickerson, Colorado Master Gardener - Broomfield County

I have one neighbor who feeds the squirrels – daily putting out pounds of peanuts for them which I find buried in my garden blocks away. Another neighbor is absolutely at war with the squirrels doing everything she can to discourage them from entering her yard. Me? They are a bit of a nuisance in my opinion, but we are largely friendly with one exception: bulbs. It's infuriating to find my freshly-planted spring bulbs scattered about the yard, the remnants of a bacchanalian rodent feast. However, last year I was determined to outwit the squirrels, and of all the bulbs I planted last year, the squirrels ate exactly ZERO. 


I was a little late in planting my bulbs last fall, and I happened to hear an interview with Dr. Lucia Jacobs, a professor at UC Berkeley who studies squirrel behavior. She said that squirrels watch each other bury nuts, and then go to dig them up in a competitive game of hoarding each fall. They also watch us when we are planting bulbs, and freshly-dug earth is like an X marking the spot for a squirrel. 


I thought a lot about that. And then I devised a plan to outwit my squirrely neighbors. And it worked!


Squirrel-Proof Bulb Planting Materials:

  • burlap yardage or squares

  • landscape staples

  • mallet or hammer

  • trug or bucket for collecting leaves

  • fallen leaves

  • bulbs

  • trowel


1. Plant the bulbs in bunches of 5-6 bulbs (or more depending on what you are planting). Plant them according to the species and at the appropriate depth. Cover with soil. For more information, check out this resource


2. Cover each planting area with a trug-full of fallen leaves. This is a great mulch and insulation. 


3. Cover the leaves with a square of burlap. Secure the burlap to the ground with landscape staples – drive them in with a mallet or hammer. 


Water each spot well, and continue to water on warm days during the winter when we haven't had recent precipitation or snow cover – generally 1-2 times per month on a day that is above 45°F.


Uncover your bulbs in early March (or even February if you planted very early bloomers). Chances are early bloomers will be emerging under the burlap. There's no need to clear away the leaves. They will have begun to decompose over the winter and will provide a little insulation from cold temperatures. The burlap can be washed and stored away or composted.


I planted tulips in these containers and used the same method to cover them. It worked perfectly!

Spring bulbs bring cheer and promise in those early days as we emerge from a cold winter, and they provide early food for some insects as well. Many including daffodils, muscari, and crocus are perennial, and since they aren't dug up year-to-year, you'll only need to cover them the year they are first planted to outsmart your squirrelly neighbors.