CO-Horts

CO-Horts Blog

Showing posts with label fall gardening. Show all posts

Friday, August 30, 2024

Fall Harvest Tips

The time of summer/fall harvest glut is upon us! 

I live and garden at high elevation, so my days and nights are cooler than some other west slope communities and the front range.  So, some of the crops I discuss in this blog, you may have already harvested in your area, or they may have gone to seed in the heat.

Various greens freshly harvested in July

In my garden as well as most gardens in the state, greens are one of the first crops ready to harvest.  You can harvest different ways:  a few leaves at a time, starting with the bottom leaves that mature first or you can cut all the leaves off at the crown or you can pull up the entire plant.  

                        This spinach was just cut.  The crowns are left so the plants will re-grow.  This is often called 'cut and come again.

Notice where the bottom leaves of this kale have been cut for harvest.

Carrots and other root crops like parsnips, beets, radishes and rutabagas are all harvested similarly.  I like to water the day before I plan to harvest so the soil isn't rock hard.  If the soil is too wet, it will be more difficult to remove soil that sticks to the roots.  Grab the carrot top firmly in your hand right above the root top, wiggle and pull up slowly.  Remove the carrots tops soon after harvest, to keep them from losing water and becoming soft.


When you see the carrot top sticking out of the ground, your carrot is close to being ready to pull!


                                            If you leave your carrots in the ground too long,                                                  especially if it has been raining a lot, your carrot roots may split!


When onions are ready to harvest, the tops will usually fall over.


Cure onions by letting the tops dry down in a well-ventilated, cool, shady place.

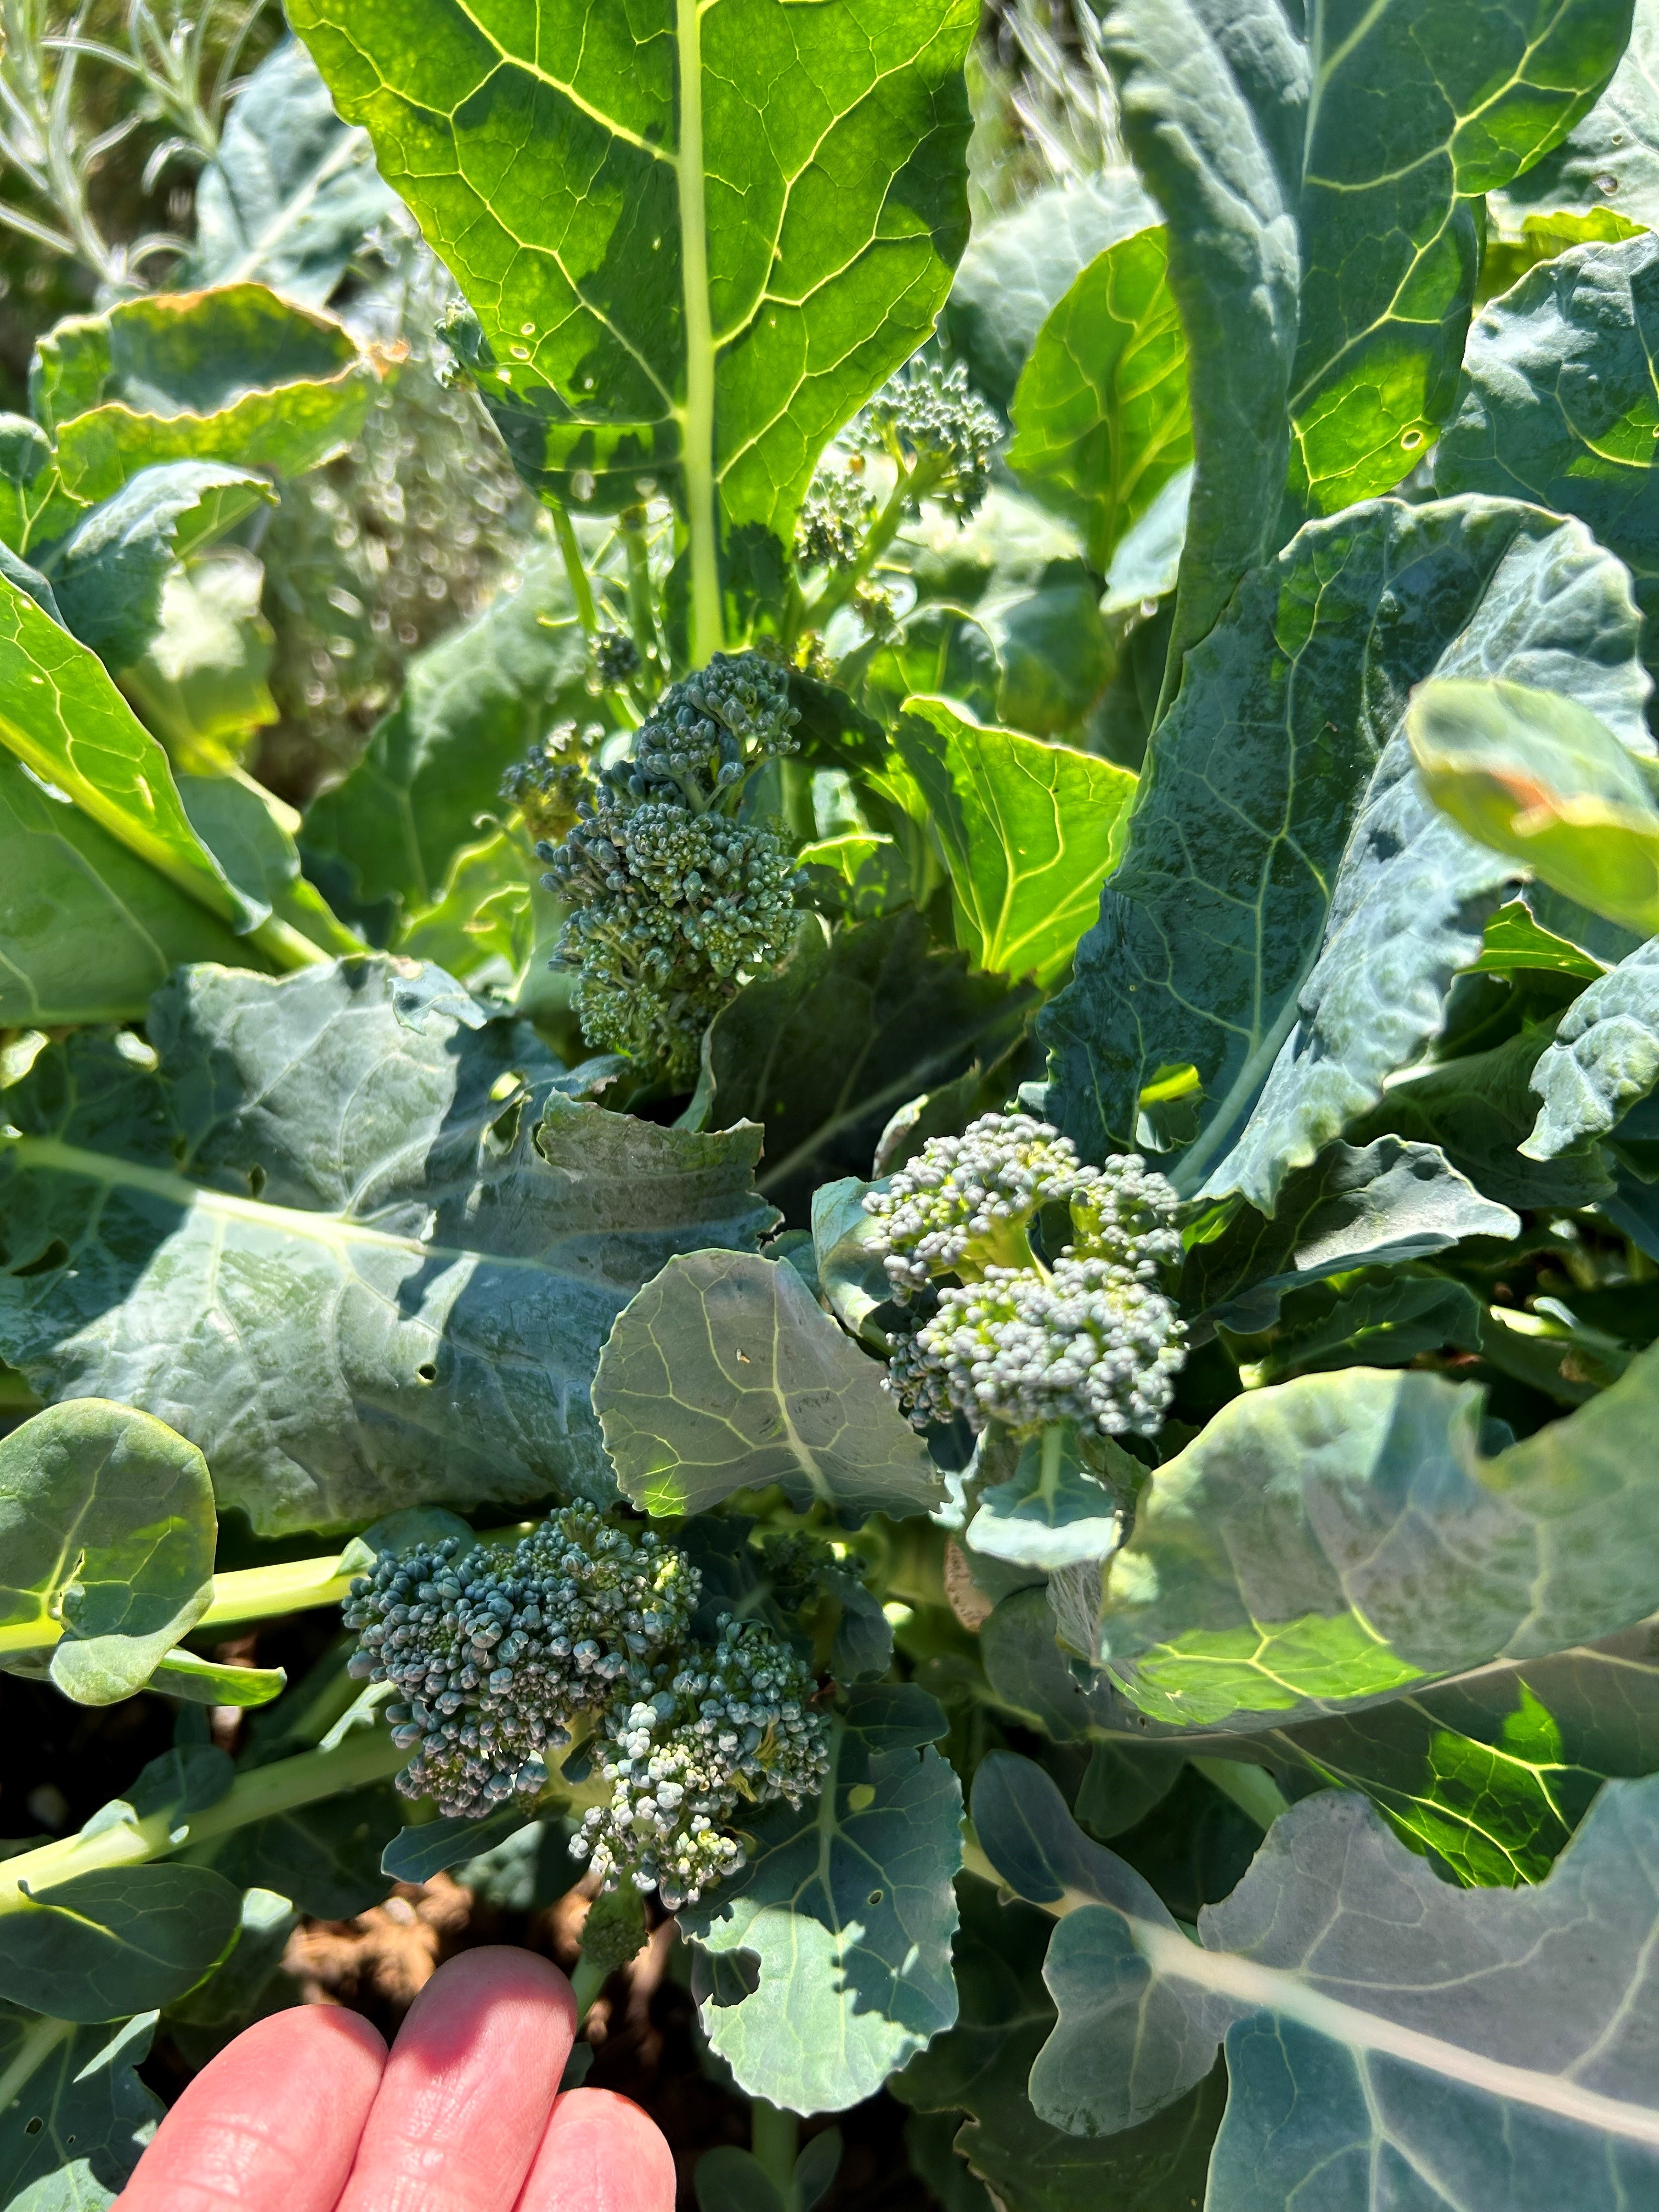
I prefer to grow broccoli varieties that produce side shoots after you harvest the main head.  This increases both your yield and extends the season of your broccoli harvest. 


Harvest broccoli heads when they are tight, firm and green.


Harvest broccoli side shoots when they are still tight buds.


  These broccoli side shoots are elongating, will get woody and go to flower quickly.


In many produce shows, the largest veggie contest is won by a zucchini!  If you've grown zucchini, you know how fast they grow!  Cucumbers, like summer squash, can outgrow their optimum eating stage very quickly.  For best eating quality, harvest when the skin is tender and the seeds are still small.


Starting at the bottom, going clockwise:
The bottom zucchini is almost past prime stage to harvest, the second zucchini could be harvested but it is baby stage, the third zucchini is prime stage to harvest, and the last zucchini is still immature.


    This pickling variety of cucumber is almost at the stage for a large pickle.  If you want small pickles, harvest when the top is barely wider than the tip.

Some pumpkins and winter squash can be harvested immature and eaten like summer squash.  And others will undergo a color change in storage.  It is best to harvest them when they are the color they are supposed to be, the rind is hard and can barely be pierced with a fingernail.


This pumpkin is immature- it is still green.


This pumpkin is beginning to color-up but will not continue to turn orange if harvested at this stage.


These pumpkins and winter squash are all their mature color-- except the spaghetti squash on the lower left-- it is still green. 


Harvest potatoes right after bloom for small, tender 'new' potatoes.  Harvest after the tops die down for potatoes with a tougher skin that will store better. 


These potatoes are starting to die down. 


For more on harvest and storage of vegetables see this Fact Sheet:  Storage of Home-Grown Vegetables – 7.601 - Extension (colostate.edu)


Wednesday, October 25, 2023

Ripening Tomatoes Indoors

by Denyse Schrenker, CSU Extension, Eagle County

The temperatures are consistently below freezing at my house and I am ready to put my gardening tools up for the season. Now I need to decide what to do with all of my unripe tomatoes that have been stuck in purgatory for most of October; not progressing under their frost blankets but also not dying. I can only handle so many fried green tomatoes and green tomato relish and salsa so I sort my tomatoes into those that will ripen off the vine and those that will not.


Some of the green tomatoes I separated for relish.

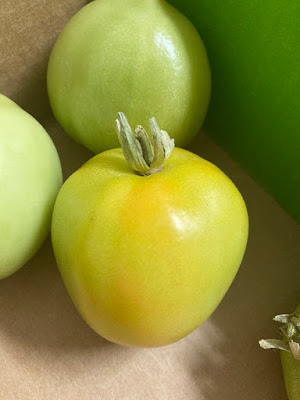
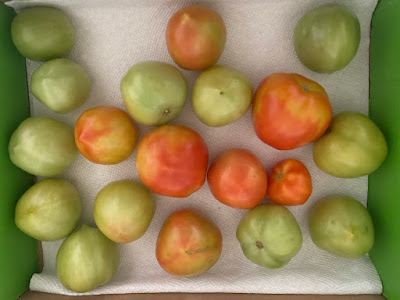
Tomatoes that are starting to develop a pink blush will ripen off the vine without any loss of flavor; this is called the breaker stage. Tomatoes that are a shiny green and have a white to light green star shape on the blossom end of the fruit have reached the mature green stage. These fruits will ripen off the vine but their flavor will not fully develop - a small sacrifice I am willing to make to eat fresh garden tomatoes well into November. Tomatoes that are a more matte green have not reached the mature green stage and will not ripen off the vine, these tomatoes can be used for green tomato recipes.


Tomato starting to develop blush color.

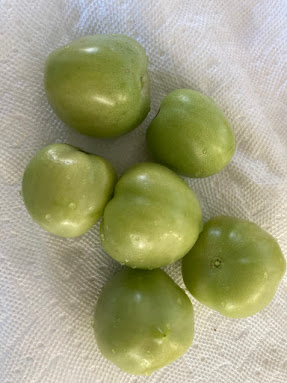
Once I have separated out the tomatoes I want to ripen, I remove any stems and wash and air dry the fruit on a clean paper towel out of direct sunlight. The dry tomatoes are then placed in layers 1-2 tomatoes deep in a covered box or a container with newspaper or cardboard covering them. I keep them in a dark cool location out of direct sunlight to ripen. Store the tomatoes at a temperature between 70°F and 55°F. Tomatoes stored closer to 70°F will ripen in a couple of weeks and tomatoes stored closer to 55°F will ripen in about a month. Tomatoes ripened below 50°F will be bland.


Washed, dried and ready to store for ripening.

Humidity can cause issues when ripening tomatoes indoors. Too much humidity causes the fruit to mold and too little humidity causes the fruit to shrivel. I typically have more trouble with too little humidity. To help increase the humidity, the tomatoes can be placed in a strainer or blanching pan and then placed in a covered container with water at the bottom. Make sure the tomatoes are not touching the water though. I check the tomatoes every couple of days and remove tomatoes that are ripe or nearly ripe. If I want the tomatoes to ripen more quickly I will add a banana or one or two red tomatoes to the green tomatoes.

Ripening tomatoes indoors does not need to be reserved for last ditch end of the season efforts! I try to pick most of my tomatoes when they develop that light blush color. I find that I get better yields harvesting them at this stage and then ripening indoors because I do not lose as many tomatoes to sunscald, critters, or simply missing them before they become over ripe. It may be the end of the gardening season but I am looking forward to having tomatoes all through the fall!

PlantTalk: Ripening Tomatoes Indoors

Tuesday, September 20, 2022

Fall Heroics: Or, How My Garage Became Filled with Plants

Posted by: John Murgel, Horticulture and Natural Resources Educator, Douglas County 

 Across much of the state, fall is in the air. First frosts have come and gone in the mountains; here on the Front Range we have a few weeks left before our average “end of tender annuals.” I am content to let most of these flashy fillers die, but some, like succulents, semi-hardy trees or shrubs, and tender bulbs and tubers are worth the effort to try to preserve year after year. These are plants which improve with size—becoming truly show-stopping only after years of cultivation. Who hasn’t admired an enormous Colocasia, prize Dahlia, or bulging Aloe? The only trick is that unlike gardeners in more temperate climes, you will have to invest some energy in keeping such plants alive to impress again next year. 

 With the exception of true tropical plants, many bulbs and tender plants used as annuals in Colorado still require a cool dormancy—a winter of sorts. Just not a Colorado winter. So the trick to keeping them for use next year is to provide the conditions of a dormant season from their native range—sometimes this is cool and damp, sometimes cool and dry, and sometimes merely dry. 
Pink Geranium maderense flowers
Geranium maderense will only flower after a "cool" winter.


 The first step is to evaluate what plants will require extra effort to be saved. Anything in a container is a must—the exposure above ground is too much for even some normally hardy plants. Tender plants and bulbs tucked into in-ground beds will likely require digging, but a plant that is at the edge of its hardiness might surprise you in the right microclimate—some Dahlias planted deeply and tucked against the foundation on the south side of the house, for example, might pull through. Without microclimate magic, though, and for real treasures, moving to storage is safer! For bulbs and tubers, dig after the tops of the plants have been killed by frost. Be extremely careful to avoid damaging the storage organ in the process; any wound is a site for decay to develop. Clean off excess soil and dry them in the shade (or indoors) for a few days to allow them to cure. Then it is time for storage. For successful winter storage, aim for 35 - 50 degrees F. If you have root cellar, they were designed for this. Garages that stay above freezing work, and even a refrigerator can work too (agreeing my wife and children on the exact ratio of ornamental plants to actual food at my house is a work in progress). Bulbs and tubers need to be kept from drying out; it seems that nearly as many techniques for this exist as gardeners. Commonly, things like Dahlias, Colocasias, and Caladiums are stored in plastic bins, loosely packed in a dampened medium, like sawdust, shavings, or even shredded paper. Check on them a couple of times a month and remove any that are beginning to rot. Keep them in the dark (remember that we’re pretending they’re in their natural habitat, underground) to prevent them from sprouting in storage. 
dahlia flower

 Succulent plants, in contrast to bulbs and tubers, need to be stored somewhere where they will get ample light. My garage is perfect for this, as it has a convenient window. The cooler your storage location for most succulents, the more important it is that they stay absolutely dry through the winter. Wet roots will translate easily into rot if it’s cool. If you need to disassemble a container for storage or plan on dividing any succulents, make sure to do it before it becomes too cool in your storage area, or keep the plants someplace warm for a while before moving them to their overwintering location—they need time to heal any root damage from re-potting to help defend against rot. "Curing" the plants out of soil for a couple of days can be very helpful too. Don’t overwater them! 

container of mixed succulents for dividing
Time to divide this container's contents!

 Keep a careful eye out for pests through the winter, particularly aphids. If any come into storage with the plants, their population can grow quickly in the absence of natural enemies. Scout your plants frequently and deal with any pests you find—early action will save you a lot of pain and heartache later in the winter. When summer returns and nighttime temperatures are above freezing, plants can be returned to their outdoor displays. For plants in the ground, be sure not to plant them in too-cold soil, as this can rot them right at the finish line! For succulents or tender plants, be sure to gradually acclimate them to direct sunlight. Just thinking about all that makes part of me want just to let all those darn plants freeze this year. But I know I’ll relent. I have an Aloe vera that badly needs dividing, and aloe divisions make great Christmas gifts!

Friday, October 18, 2019

The Basics of Fall Bulbs

By Sherie Caffey, Horticulture Agent, CSU Extension-Pueblo County

Are you wanting to get a head start on some Spring color in your garden? Fall planted bulbs will come up early in the Springtime and help you to shake the winter blues away. Bulbs are best planted in September to October, so don’t delay, plant some bulbs today!
Fall planted bulbs include things like crocus, tulips, hyacinths, and daffodils. There is a direct correlation between the size of the bulbs and the size of the flowers they will produce, so choose the biggest and best bulbs. Try and plant bulbs that are not damaged or moldy. Choose a well-draining site that is visible so you can enjoy the flowers when they come up.
Since bulbs need to be planted more deeply than seeds, you must prepare the soil in the planting area a little differently. You should excavate and mix in soil amendments to the depth that your deepest bulb will go. Be sure the soil is nice and fluffy underneath your deepest bulb so it does not become water logged. If you have a very heavy clay soil, you should amend it with peat moss or well decomposed compost to loosen it up.
Use the planting chart on the packaging of your bulbs to determine how deep to plant them. Generally, this depth will be about four times the height of the bulb between the soil surface and the tip of the bulb. Be sure the growing tip is pointing up. It is a good idea to cover the planting site with about 3 inches of mulch to prevent freezing and thawing of the soil. You can remove the mulch in April, or if it is easily penetrated by the shoots it can be left in place.
            Flower bulbs are great, but don’t forget about the amazing culinary bulb, garlic! Garlic can also be planted this fall for harvest around July. You can get many varieties of garlic to plant at your local garden center. Soft neck garlic is what you typically find in the grocery store, it has relatively small cloves and a long shelf life. Hard neck garlic produces a big attractive flower stalk that can be used in cooking.
            Break apart your garlic head into individual cloves. Choose large, firm cloves to plant, and leave the papery outer layer on. The cloves should be planted two to three inches deep and about six inches apart. Plant the cloves with the pointy end facing up. Water the garlic and add a couple inches of mulch. Over the winter you should water if there is no precipitation for an extended amount of time. 
            Check out the CSU Extension website for more information on flower bulbs and garlic! Happy planting!

Monday, October 1, 2018

Planting Fall Bulbs for Spring Color

Posted by: Alison O'Connor, Larimer County Extension

I've always dreamed of having a spring landscape filled with daffodils, crocus and tulips--one that made people drive by slowly, admiring the riot of color. I spent a spring in England during my undergraduate degree and their fields of daffodils were so beautiful...
Thousands of daffodils at a park in London (photo from Flower Magazine)
After a tough summer with countless hailstorms, my gardening motivation has withered. But the thought of starting next year with cheerful and colorful spring bulbs got me excited. So I indulged and bought bulbs. Lots and lots of bulbs. Too many bulbs. I got them home and thought to myself, "Oh no. Now I have to plant these things."
Lots and lots of bulbs to plant. Sigh.
I bought a total of 93 bulbs (allium, hyacinth, daffodils, tulips, crocus). I picked out my bulbs by hand, but if you're planting en masse, then purchasing in bulk is easier and likely cheaper. You can also time bulbs based on bloom period (early, mid or late spring) and color. Confession: I picked out a lot of my bulbs because of their name. For example, I had to buy the hyacinth 'Jan Bos'. Jan is my mom's name and we had a dog named Bosley growing up. Jan Bos!

After such a dry summer, the thought of trying to dig in our soils nearly made me go rest on the couch. But I didn't! And I got those bulbs planted. All of them. And here's how I did it:

Spring bulbs are pretty easy to work with. Essentially, you dig a hole, stick the bulb in, roots side down (pointy end up!), and cover with soil, and water in. Easy peasy. But the type of bulb and the depth at which you plant is important. You're aiming to plant the bulb about 3-4 times the height. So bigger bulbs need deeper holes. Small bulbs are just barely below the surface.
A little comparison of planting depths. Crocus are only 3" below the soil surface; daffodils can be up to 8", depending on the size of the bulb you're planting.
You can decide what bulbs you want to plant together...or have large clumps of the same type. In general, small bulbs will look better if planting in large patches. Large bulbs, like the giant alliums, can stand alone. Hyacinth have wonderful fragrance and the impact is better when in groups. Some bulbs will naturalize and form large clumps over the years (daffodils, squill). You can even plant big bulbs together with small bulbs in the same hole--you just fill in the hole with soil for the correct depths for the bulbs you're planting.
Daffodils just poking their heads out before they are planted.
I planted the bulbs in several areas throughout the front yard. I have planted bulbs in the past, so accidentally sliced a few of the older ones. Oops. But what's fun to see are the new roots that the old bulbs are forming. Check out these crocus:
Crocus that were uprooted during the new bulb plantings. I just tucked them back in.
Following planting, be sure to water in your bulbs and cover with mulch. If you have animals that like to dig up plants, place chicken wire over the top of the planting hole. Consider planting bulbs that are deterrents to animals, like frittilary, allium and snowdrops, among others.
Water in your bulbs and cover with mulch.
The great thing about bulbs is that you kind of forget you planted them and next spring it's a fun surprise to see them bloom! Just knowing the bulbs are there gives my tired fall garden a boost. I'll try to remember to take photos in the spring for you.
(The tired fall garden.)
In the front of this bed I planted 30 crocus and small alliums.
Get out and plant some bulbs--our Front Range Colorado soils tend to stay warm until November, so try to plant by mid-October so that the bulbs can form new roots before the soil freezes. They also need several weeks of cold treatment in order to bloom in the spring. Need more information? Check out the CSU publication on fall planted bulbs. Oh, and should you fertilize? Well, I never fertilize anything in my landscape. The bulb you plant this year should have plenty of "oomph" to bloom next year. If you keep bulbs year-to-year, they will benefit from fertilizer following bloom next year.

The best part about planting was finding this praying mantid...she (he?) was perched on top of my rose, enjoying the beautiful fall day.....and waiting for something to eat.
Hello, world!