CO-Horts

CO-Horts Blog

Tuesday, July 28, 2020

Fresh Cut Flowers Bring the Beauty Inside


Posted by: Deryn Davidson, Horticulture Agent, Boulder County

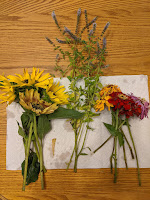
One of my favorite things to do this time of year is make bouquets and flower arrangements from freshly cut flowers out of the garden. Lots of people plant flowers in their vegetable gardens and those common species are great for arrangements. Sunflowers, zinnias, dahlias, marigolds, snapdragons, and even herbs like dill and mint make great material for bringing a splash of garden beauty into your home. Of course you can combine any of those, with flowers from your annual and perennial beds too.

Sunflower, zinnias, mint and dill

There's a good chance that if you cut a handful of flowers from your garden and pop them in a vase, they'll look pretty good, but pro floral design definitely requires technique, practice and creativity. Here are a few tips you can follow to take your garden bouquets to the next level.

THE FLOWERS
1. Cut your flowers early in the morning before the heat of the day sets in.
2. Make clean cuts at an angle with a sharp tool. This allows for better water uptake.
3. Choosing flowers and plant material to combine: larger flowers for mass; tall thin material to create lines and define the shape of the arrangement; fillers to fill in empty spaces.
***Sometimes you'll have an arrangement that is all mass or all fillers, but when starting out look for a variety of shapes and texture to give your design more interest***

THE CONTAINER
This can be anything that holds water. Vases, coffee cans, pitchers, mason jars, you name it! You want to generally match the container to the flowers. Big heavy flowers (ex: peonies) need a container that will visually balance them out and also avoid making the arrangement top heavy and possibly falling over.

THE ARRANGING
I like to spread my plant material out on the table and assess what I have. Then you can start adding pieces to the container one by one and build the arrangement.


Key things to keep in mind as you design

1. Proportion: This is not only about the flowers, but also the container. As I mentioned, find the right container for the flowers you've chosen, but also pay attention to how each flower relates to the others in size. You can start to image your arrangement before you begin to build based on what you see in front of you. You want your container to be about 1/3 the height of the overall arrangement.

2. Balance: You can go with symmetrical, where each side is pretty much a mirror image of the other side. Or asymmetrical where if a line is drawn through the middle of the arrangement the two sides are not mirror images, but they are equally "weighted". Perhaps you have 5 small flowers on one side and 1 large flower on the other to balance things out.


3. Harmony: Look at the colors you've chosen. Are they complimentary (opposite sides of the color wheel like yellow and purple) or perhaps monochromatic (one color).
                                                                        
Sunflowers, zinnias and mint
Bachelor buttons, Engelmann's daisy, dill, larkspur (arranged by Allison Appelhans)

Zinnia, prairie sage, blanket flower, marigold (arranged by Allison Appelhans)

Goldenrod, cosmos, maxmillian sunflowers, salvia, aster, verbena (arranged by Allison Appelhans)
As single flowers start to fade, you can pull them out and either replace with fresh, or simply allow the arrangement to change over the course of the week, freshening water and doing minor rearrangements until it's time to start completely fresh (usually about a week). Hopefully these simple, but beautiful creations will inspire you to bring some of your garden's beauty inside to enjoy!

Monday, July 20, 2020

A Few Of This Seasons Squash and Cucumber Problems


by Yvette Henson
San Miguel Basin, CSU Extension


Summer squash and cucumbers are generally two of the easiest and most productive veggies to grow in Colorado gardens, provided they get enough warmth.  Winter squash can be a bit more difficult because they need a long season to mature fruit.  Even though they are easy to grow, given the right conditions, they are not without problems.  In the last two weeks, myself, my Mom and my friend Pam, have experienced thrips on cucumbers, blossom end rot on summer squash and squash bugs on winter squash. 
    

Thrips are very small, slender insects with feathery wings.  Western flower thrips feed on hundreds of species in our area, including cucurbits (name for all squash, pumpkins, gourds, cucumbers, melons).  They have piercing, sucking mouthparts and feed on buds, flowers and leaves, weakening plants and deforming fruits.  They can transmit virus diseases.  They can also fill a beneficial role and feed on spider mites but that isn’t comforting to me right now-- It's my 2 precious cucumber plants that are infested.  
Thrips on cucumber flower


Thrips feeding damage on cucumber leaf

Thrips thrive in hot, dry conditions—just what I have been experiencing so far this summer.  Cultural controls are to spray the foliage when watering to create a more humid environment and to remove weeds in the area that may be alternate hosts for thrips.   Also, don’t apply too much nitrogen fertilizer, which encourages thrips population explosions.  (Ooops!  I was just trying to get my plants to grow fast so I could get fruit in my short-season!)  

Other control options for thrips, including organic and inorganic pesticides, can be found in this publication: http://ipm.ucanr.edu/PMG/r116302111.html  Research any and all insecticides before using to be sure that they won’t kill non-target beneficial insects and remember to always follow the label!  


Tomatoes aren’t the only ‘vegetable’ to get blossom end rot.  My Mom ended up with blossom end rot of her summer squash (see photo).  The cause of blossom end rot is insufficient calcium uptake by the plant due to inconsistent moisture levels in the soil.  This is not the same as a calcium deficiency in the soil.  It is more common on the first fruits of the season.  On rare occasions, it can be caused by insufficient pollination. 

 
Blossom end rot on summer squash


To prevent blossom end rot, water regularly and evenly to about 6-8”deep – don’t allow soil to dry out too much between watering but don’t allow soil to be waterlogged either.  Something else to try that seems to have worked for me is to apply a liquid Cal-mag fertilizer occasionally.  See this publication for more information on blossom end rot on veggies: https://www.canr.msu.edu/news/blossom_end_rot_causes_and_cures_in_garden_vegetables

I live in the mountains so my cucurbits are just starting to grow and bloom.  My friend Pam lives in Olathe, a much warmer climate, and her warm-season veggies are starting to produce.  She hasn’t been home much because of work, so she asked me if I wanted to harvest some of her garden.  Why, of course!  Thank you, Pam!  When I wasgleaning from her garden, I noticed that one of her squash plants was wilted.  At first, I thought it was squash vine borers, but I couldn’t find any larvae or frass inside the base of the wilted vine.  On second inspection, I found 4 dreaded squash bugs!

male and female squash bug (I interrupted their mating to take this photo)


2 of 5 winter squash plants showing wilt symptoms from squash bug feeding

Squash bugs can be found most commonly on winter squash and pumpkins but they sometimes feed on summer squash, gourds and melons.  They lacerate plant tissue when they feed, causing rapid wilt and eventual death of the plant.  One thing that Pam could have done to reduce squash bugs was not to use the black plastic mulch as weed control.  Mulch gives the squash bugs more places to hide.  She decided to use an insecticide she already had that was listed as a control in this fact sheet:  https://extension.colostate.edu/topic-areas/insects/squash-bug-management-in-home-gardens-5-609/  The sad thing is she will most likely lose most of the plants that are already infested.  The original affected plant I saw progressed to 5 affected plants in just a week!


More information about other problems one might experience when growing other cucurbits, not jsut squash and cucumbers can be found below.


In instances where there are not enough pollinators or plants are grown under season extension covers there may not be pollination and fruit set file:///C:/Users/YvetteH/Downloads/FruitSetProblems.pdf


Cucurbits can also be attacked by cucumber beetles, aphids, spider mites and powdery mildew and more!  https://hgic.clemson.edu/factsheet/cucumber-squash-melon-other-cucurbit-insect-pests/

Monday, July 13, 2020

Garden Problem Tour

By Sherie Caffey, Horticulture Agent, CSU Extension-Pueblo County


   This summer, COVID-19 has the Extension office in Pueblo closed down, so I have been working from home. This has given me a chance to look around at things going on in my yard and garden that I haven’t had time to pay attention to in previous years. Of course there is a lot going right, but here is a little tour of the issues I have found this year. Maybe you have some of the same issues, and I can offer some suggestions on what you can do to remedy them.
   I have several trees in my yard that were here when I moved in. While doing some much needed trimming earlier this year, I noticed one of my American Elms had a very black trunk and branches. Upon further inspection, I noticed small brown and white structures in the cracks of the bark that looked similar to mealy bugs. What I have is a pretty bad case of European Elm Scale. The black color on the trunk and branches is black mold and is commonly associated with scale infections. There aren’t many control mechanisms that work well, but if you have Elm Scale you can see your options here: https://planttalk.colostate.edu/topics/insects-diseases/1400-24-european-elm-scale/. For me, this tree is not in a great place and runs into my power lines so I won’t be sad to lose it and therefore probably won’t treat it. If my neighbors or myself had other American Elms it could spread to this might be more of an issue.
   The next problem I saw in my yard was in my lawn. It looked really great earlier in the year, but with the extremely hot weather we have been seeing in Pueblo I’ve been seeing some brown spots appearing. There are many potential causes of brown spots in lawns, but by far the most common cause is a lack of water due to poor irrigation coverage. I’m sure this is the problem that I am seeing, but to be sure I will be performing a simple at home lawn irrigation audit. To do this, set out identical containers in different spots in your lawn (brown spots and green spots) and run your system. You can measure the amount of water in each container to see if the brown spots are getting less water. To read more about brown spots in lawns click here: https://planttalk.colostate.edu/topics/lawns/1553-brown-spots-lawn/#:~:text=1553%20%E2%80%93%20Brown%20Spots%20in%20the,to%20maintain%20a%20healthy%20lawn.
   Next, I checked out my vegetable garden and noticed my zucchini plant had leaves that looked white and powdery. This is a common fungus you might see on cucurbits, called powdery mildew. It’s caused most often by poor air circulation and too much shade. Shade is definitely my problem. Neem and horticultural oils can be used on existing infections, but can damage plants if used improperly so always read the label and check out this link for extra information: https://planttalk.colostate.edu/topics/vegetables/1833-powdery-mildew-vegetables/. I’ve made my first application of Neem oil and am hoping for good results.
   Also in my vegetable garden, I noticed some of the tomatoes were getting cracks and indentions. This can be caused by inconsistent watering. The plants get a bit dry, and then suddenly get a bunch of water, and the fruit basically outgrows its skin and cracks. I think I will try to be better about the watering schedule, and also add some grass clippings or straw as mulch to stabilize the soil moisture. I know a lot of people have various problems with tomatoes. This fact sheet is amazing for narrowing down the problem: https://extension.colostate.edu/topic-areas/yard-garden/recognizing-tomato-problems-2-949/.
   So that’s a tour through the yard and garden issues I am having. I hope someone will see one of my shortcomings and be helped by it!

Tuesday, July 7, 2020

Cole Crops for Fall Harvest

Posted by Sarah Schweig, Broomfield County Extension

I grew kohlrabi in my home garden for the first time this spring. I opted for a purple variety, though more common varieties are light green to white. The plants were beautiful, tasty, and front runners for the Least Fussy Award. A spot of good luck? Perhaps, but this was a feat for a spring crop for reasons I'll describe below. My overwhelming feeling was “Why didn’t I start growing these earlier?” I'll be seeding for a fall crop soon, and if you haven't grown kohlrabi yet, you can still give it a try this season.
White and Purple Kohlrabi (Photo: University of Kentucky)
The name kohlrabi comes from German and translates to “cabbage turnip.” Turnip and kohlrabi are both Brassicas. Rather than the edible taproot of turnip (Brassica rapa), the prize of the kohlrabi plant (Brassica oleracae) is the stem, which enlarges at maturity, forming a turnip-like bulb just above ground. Kohlrabi has a more mild flavor than turnip and is ever so slightly sweet, but they’re prepared in the same way.

Kohlrabi is more closely related to - in fact, the same species as - heading cabbage, broccoli, cauliflower, brussels, and kale, collectively referred to as cole crops. Whereas turnips and kohlrabi will provide you with a similar experience once prepared, I have always loved thinking about the totally different experiences modern Brassica oleracae varieties offer. My favorite description of the species is having a “remarkable natural tendency for thickening of plant parts,” and it provides the perfect visual for their domestication and divergence from the same wild cabbage plant.

Photo from University of Nebraska
Kohlrabi was bred by selecting for thicker stems; cauliflower through selecting for thicker immature florets; broccoli was selected for thicker florets and floral stems. While selecting for a thick terminal bud gave us cabbage, selecting for many enlarged axillary buds (the "sprouts") gave us brussels.

I’m glad I successfully dipped my toe in growing kohlrabi this spring, but I’m partial to growing cole crops for a fall harvest for a few reasons. First, it’s easier to direct seed. Cole crops like soil temperatures around 80ºF for germination, but they can bolt or become overly tough or bitter if temperatures are too warm, especially around heading. Combined with relatively long time to maturity, it’s a challenge to get the timing right when starting these plants from seed in the spring.

Pest pressure can also be eased in planting for a fall harvest. I tend to have issues with flea beetles. Most flea beetle damage is caused by adults, which chew characteristic “shot holes” on the interior of leaves. While plants can withstand quite a bit of this type of injury once established, flea beetles can be tough on younger plants. In my fall crop, I get to avoid their most active time in vegetable gardens (late May and early June in my area).


With early kohlrabi varieties maturing in as little as 40 days, and most common varieties maturing in around 60, July to August is a good time to seed your fall crop for a harvest in September, depending on your location. They can withstand some frost, and bonus, you can get bigger, sweeter harvests with a fall crop. Kohlrabi is usually harvested when the bulbous stem is 2-3” wide. After this point, the stem can become woody in higher temperatures, but cooler temperatures in the fall will keep them more tender longer.


Like familiar Brassicas, kohlrabi is a heavy nitrogen feeder and requires ample moisture and space to develop properly. Use an organic mulch to help regulate moisture and soil temperature. Most varieties require a minimum of 12” spacing, but always check your seed packet for specific information. Planting too close together may result in elongating of the stems rather than the thickening you want to see. Harvest the whole plant (I’m a big fan of the greens) by cutting just above the soil surface. Kohlrabi can be stored for months in cold, moist conditions (around 36ºF and 95% humidity), but most of us can’t create these conditions at home. Kohlrabi will last a couple of weeks after harvest in your refrigerator. 


For more information on cole crops and other ideas for your fall vegetable garden, check out the new Colorado Vegetable Guide.

Thursday, July 2, 2020

The Fascinating Lives of Butterflies

Posted by: Lisa Mason, Arapahoe County Extension

One of my favorite parts about summer is watching butterflies. We have quite a variety of species in Colorado—over 250 according to Butterfliesandmoths.org. What is so fascinating about butterflies? For me, one aspect is the process of metamorphosis. Many insects go through a full metamorphosis, but butterflies and moths can have such striking colors and patterns on the caterpillars, cocoons and chrysalises, and the adults.

I recently had a client contact the Extension office about caterpillars feeding on pansy plants. When I saw pictures, I knew they were the variegated fritillary caterpillars (Euptoieta Claudia)! Since the voracious caterpillars were causing quite a bit of damage to the pansies, he was looking to remove them. I immediately agreed to take them! I took photos at various stages of their life so I could share the wonderment with you. See the pictures at the bottom of this post.

The viceroy butterfly (Limenitis archippus) closely mimics the monarch. Photo: Lisa Mason 

Butterfly and Moth Basics

Some facts—butterflies and moths:
  • Are part of the insect order Lepidoptera meaning scale wing
  • Are characterized by two characteristics: 1) their wings are covered in scales which are modified hairs, and 2) they have a proboscis which is a long, tubular mouthpart.
  • Go through a full metamorphosis consisting of four life stages: an egg, larva, pupa and adult
  • Have slight variations in each individual—just like a snowflake, no two individuals are the same, but the differences are very hard to spot in the outdoors
You can distinguish a butterfly from a moth a few different ways. Butterflies are diurnal, active during the day, while moths are generally nocturnal, active a night. Butterflies also tend to be more colorful which helps them attract a mate. Moths attract mates through smell. Their dulled colors help them camouflage at night to avoid predators. In addition, butterflies generally have antennae that are clubbed-shaped versus moth antennae usually taper to a point, or look feathery. Male moths in particular have large, feathery antennae. Moths also appear “fuzzier” than butterflies because the scales on their body are much thicker to keep them warm since they are mostly active at night. Butterflies rely on the sun to keep them warm. Both position their wings differently. Butterflies tend to fold their wings together, and moths hold their wings out to look more like a tent-shape.

Migration Phenomenon

One of the most fascinating things about butterflies is the migratory patterns of some species. Two migratory species of note that occur in Colorado are the monarch and the painted lady.

Monarch butterflies (Danaus plexippus) host on milkweed plants (Asclepias spp.) which contain a milky compound that is toxic to predators such as birds. The bright colors on monarch butterflies is often a warning to predators about the toxicity.  The migratory corridor of monarchs is through the Midwestern US as far north as Canada, and as far south as Mexico. Monarchs also migrate up the west coast of the US.  Colorado is not directly on the migratory path of monarchs, but we do see them here. Monarch butterflies use the position of the sun to navigate and a magnetic compass to orient when the days are cloudy. They possibly use a combination of both regularly. More research is needed to fully understand how monarchs navigate for the migration. More information here.
Adult monarch butterfly. Photo: Lisa Mason

Monarch butterfly caterpillar feeding on milkweed. Photo: Lisa Mason
Painted lady butterflies (Vanessa cardui) are a common butterfly seen in Colorado. You may remember in 2017 when we had an explosion of painted lady butterflies in the fall! Painted lady butterflies are also a migratory species. They overwinter in the southwestern US and in Mexico. They migrate northward in the spring as plants become available. The population numbers in Colorado and surrounding areas depend on the weather in the southwestern US. When the southwest has more precipitation, the butterfly population will increase. All those butterflies then migrate northward. When the southwest has years of less precipitation, you might not see many butterflies. Painted lady butterflies are generalists and will forage on a variety of nectar-producing flowers. The caterpillars host on thistle, hollyhock and sunflowers. More information here.

Painted lady butterfly. Photo: Lisa Mason
A Few Other Species in Colorado

Two-tailed swallowtail butterflies (Papilio multicaudatus) are large (up to 5 inches long), yellow and are a commonly seen butterfly along the Front Range. The caterpillars feed on green ash and chokecherries. With the emerald ash borer growing along the Front Range, two-tailed swallowtails will many lose many ash trees as potential host sites. What can you do? Plant chokecherry trees! If you treat your ash tree to protect it from EAB, likely trunk injections would be a safer treatment method for these butter flies rather than trunk sprays.  The adults feed on nectar from thistles, milkweed, and other flowers. Two-tailed swallowtails can be differentiated from tiger swallowtails by a second projection off their hindwing. More information here.


Two-tailed swallowtail adult. Photo: Lisa Mason

Two-tailed swallowtail caterpillar. Photo: Lisa Mason
Black swallowtail butterflies (Papilio polyxenes) had a great year in 2019. They were very common in gardens along the Front Range. The butterflies are large and mostly black with some yellow markings. They host on plants in the carrot family (Apiacaea) including dill, parsley, and fennel. When the caterpillars are small, their colors resemble bird droppings that can help them camouflage. As the caterpillars grow, their colors become more striking with green, black and orange markings. More information here.

Colorado hairstreak butterflies (Hypaurotis crysalus) is the Colorado state butterfly! Haven’t seen this butterfly? You are not alone. They tend to be fast fliers. These butterflies host on gambel oak, which is a common shrub in the Colorado foothills and mountains. They don’t stray too far from their host plants, even as adults. You likely won’t catch these butterflies on flowers either. They tend to feed on sap from the trees, and honeydew from aphids and other insects. Some years have higher populations than others, likely dependent on the weather. More information here.

Common buckeye butterflies (Junonia coenia) aren’t the most common butterfly you see in Colorado, so if you do see them, take note! These lovely butterflies overwinter in the south where is warmer. Adults will migrate north to places like Colorado and will colonize over the summer months. The adults prefer flowers in the Asteraceae family including aster, gumweed, and tickseed flowers. Caterpillars host on snapdragons, toadflax and plantains. More information here.


Common buckeye butterfly. Photo: Lisa Mason
Attracting Butterflies

To attract butterflies to your backyard this summer, provide the following:
  • Nectar plants that are brightly colored and have a landing pad for the adults
  • Caterpillar host plants
  • Sunny, open areas
  • Trees and shrubs to protect them from wind and weather
  • A water source such as a shallow dish
For more information, visit Attracting Butterflies to Your Garden. Visit butterfliesandmoths.org for details on what species have been documented in your area. You can find a lot of great field guides on butterflies. I recommend the Field Guide to Butterflies of North America by Jim Brock and Kenn Kaufman.

I hope you enjoy observing butterflies this summer! Here are the photos from the rearing variegated fritillary butterflies.

Cage setup with fresh pansies. 
Up close of a caterpillar. 
Feeding frenzy. 

Chrysalis. 
Newly emerged butterfly. 
Time to fly!