CO-Horts

CO-Horts Blog

Showing posts with label Broomfield. Show all posts

Thursday, October 5, 2023

How to Squirrel-Proof Your Bulbs

 by Angela K. Nickerson, Colorado Master Gardener - Broomfield County

I have one neighbor who feeds the squirrels – daily putting out pounds of peanuts for them which I find buried in my garden blocks away. Another neighbor is absolutely at war with the squirrels doing everything she can to discourage them from entering her yard. Me? They are a bit of a nuisance in my opinion, but we are largely friendly with one exception: bulbs. It's infuriating to find my freshly-planted spring bulbs scattered about the yard, the remnants of a bacchanalian rodent feast. However, last year I was determined to outwit the squirrels, and of all the bulbs I planted last year, the squirrels ate exactly ZERO. 


I was a little late in planting my bulbs last fall, and I happened to hear an interview with Dr. Lucia Jacobs, a professor at UC Berkeley who studies squirrel behavior. She said that squirrels watch each other bury nuts, and then go to dig them up in a competitive game of hoarding each fall. They also watch us when we are planting bulbs, and freshly-dug earth is like an X marking the spot for a squirrel. 


I thought a lot about that. And then I devised a plan to outwit my squirrely neighbors. And it worked!


Squirrel-Proof Bulb Planting Materials:

  • burlap yardage or squares

  • landscape staples

  • mallet or hammer

  • trug or bucket for collecting leaves

  • fallen leaves

  • bulbs

  • trowel


1. Plant the bulbs in bunches of 5-6 bulbs (or more depending on what you are planting). Plant them according to the species and at the appropriate depth. Cover with soil. For more information, check out this resource. 


2. Cover each planting area with a trug-full of fallen leaves. This is a great mulch and insulation. 


3. Cover the leaves with a square of burlap. Secure the burlap to the ground with landscape staples – drive them in with a mallet or hammer. 


Water each spot well, and continue to water on warm days during the winter when we haven't had recent precipitation or snow cover – generally 1-2 times per month on a day that is above 45°F.


Uncover your bulbs in early March (or even February if you planted very early bloomers). Chances are early bloomers will be emerging under the burlap. There's no need to clear away the leaves. They will have begun to decompose over the winter and will provide a little insulation from cold temperatures. The burlap can be washed and stored away or composted.


I planted tulips in these containers and used the same method to cover them. It worked perfectly!

Spring bulbs bring cheer and promise in those early days as we emerge from a cold winter, and they provide early food for some insects as well. Many including daffodils, muscari, and crocus are perennial, and since they aren't dug up year-to-year, you'll only need to cover them the year they are first planted to outsmart your squirrelly neighbors.

Thursday, April 21, 2022

Increasing Carbon Dioxide for More Productive Plants?

Musings of a Cell Biologist on the Way to Becoming a Colorado Master Gardener

Posted by Kristin Moore, Master Gardener Apprentice  

As gardeners we spend a lot of time trying to figure out how to make our plants grow as productively as possible. However, if we really boil down the major constituents that make up a plant, it comes down to a small number of chemical molecules and elements. Water, which is generally taken up through the root system of a plant, can make up 80-90% of a live plant’s mass. However, if we take water out of the equation, the chemical elements that make up the vast majority of the dry mass of the plant (the mass recorded after water has been dried out) are carbon and oxygen, which combined make up approximately 90% of the dry mass of a plant. Another 6% dry mass is made up by hydrogen. The remaining 4% of plant dry mass is made up of the other 17 essential nutrients that we spend lots of time (and money) supplementing our soil with (examples: nitrogen, potassium, and phosphorus). While those other 17 nutrients are absolutely essential to plant growth and productivity, I am going to focus on the 90% of the plant that is carbon and oxygen for this article.

Have you ever stopped to think about where all the carbon and oxygen that make up most of what we’d really consider to be a plant (leaves, stems, bark, etc.) come from? Your initial response may be that they come from the soil and get incorporated into the plant through the roots. If so, you are not alone in this assumption (See this video that asks graduating MIT students this same question). In reality, all of the carbon and most of the oxygen come out of the air. Photosynthesis, the unique trait of all green plants (and some bacteria and algae), is the process of utilizing energy from sunlight to convert gaseous carbon dioxide (CO2 - a carbon atom bonded to two oxygen atoms) into the sugars and structural molecules such cellulose that makes up the energy storage and fibrous tissue of most plants. Plants do not actually “suck up” carbon from the ground. That 90% of the dry mass of a plant came from converting the CO2 in the air into carbon-based molecules in the plant.


This fact then begs the question: in an era of increasing CO2 emissions and concentrations in our atmosphere, might plants actually benefit from increased concentrations of carbon in their environment? Could they grow bigger faster since one of their major nutrients is now in excess? As it turns out, the answer to this question is a lot more complex than it may initially appear. There is strong evidence that increasing atmospheric CO2levels does increase the photosynthetic rate of plants. This results in larger, faster growing plants. Higher CO2concentrations also results in less water loss for many types of plants. This is because plants have to open up pores on their leaves called stomata to let CO2 from the air into the plant. When stomata are open, not only can CO2 come in, but water can also escape out into the air. With higher CO2 levels these pores are open for less time resulting in less water loss from the plant.


That all sounds pretty great! Bigger plants with lower water consumption! However, the increased rate of carbon incorporation into plant tissues results in increased amounts of sugar (mostly made of carbon and oxygen) compared to protein (lots of nitrogen) in a plant. Thus, plants grown in elevated CO2 may not have the same nutritional value (more sugars and less protein) as those grown under current CO2 levels. There is evidence to indicate that insects feeding on these plants have poorer outcomes and cause more plant damage as they try to make up for these nutrient shortcomings. One way to fix this imbalance may be to increase nitrogen supplementation through fertilization, which can be costly and have other impacts. Additionally, the impact of having extra sugar molecules accumulating within the plant is unknown. While sugars provide energy and structure to a plant cell, they can also signal plants to make changes in the way they grow. We are just starting to gain an understanding of how the increases in sugar accumulation due to increased CO2concentration would impact this facet of plant physiology. Lastly, the overall increase in temperatures that accompany increased CO2 production as well as the changes in weather patterns will ultimately have a huge impact on plant growth and productivity. Many of the current predictions indicate that these will not increase plant yields.


Schematic from 'Preserving the nutritional quality of crop plants under a changing climate: importance and strategies' (Soares et. al., 2019). GHG = greenhouse gas; eCO2 = elevated carbon dioxide; Single letter chemical element abbreviations outlined in red boxes; OM = organic matter. 


Combined, all of these data indicate that the impacts of changing levels of atmospheric CO2 on plant physiology, production, and value remain…complicated at best. Although increased plant growth and decreased water consumption are consistent results in many experiments run under increased atmospheric CO2 concentrations, there is an upper limit to this increase. Furthermore, how these plants will adapt to their new environments (water availability, temperature, growth season length, etc.), and whether they will have the same value as those grown today is uncertain. What is certain, is that our changing environment will ultimately results in changes to plant productivity and their critical role in the global carbon cycle.

Tuesday, July 7, 2020

Cole Crops for Fall Harvest

Posted by Sarah Schweig, Broomfield County Extension

I grew kohlrabi in my home garden for the first time this spring. I opted for a purple variety, though more common varieties are light green to white. The plants were beautiful, tasty, and front runners for the Least Fussy Award. A spot of good luck? Perhaps, but this was a feat for a spring crop for reasons I'll describe below. My overwhelming feeling was “Why didn’t I start growing these earlier?” I'll be seeding for a fall crop soon, and if you haven't grown kohlrabi yet, you can still give it a try this season.
White and Purple Kohlrabi (Photo: University of Kentucky)
The name kohlrabi comes from German and translates to “cabbage turnip.” Turnip and kohlrabi are both Brassicas. Rather than the edible taproot of turnip (Brassica rapa), the prize of the kohlrabi plant (Brassica oleracae) is the stem, which enlarges at maturity, forming a turnip-like bulb just above ground. Kohlrabi has a more mild flavor than turnip and is ever so slightly sweet, but they’re prepared in the same way.

Kohlrabi is more closely related to - in fact, the same species as - heading cabbage, broccoli, cauliflower, brussels, and kale, collectively referred to as cole crops. Whereas turnips and kohlrabi will provide you with a similar experience once prepared, I have always loved thinking about the totally different experiences modern Brassica oleracae varieties offer. My favorite description of the species is having a “remarkable natural tendency for thickening of plant parts,” and it provides the perfect visual for their domestication and divergence from the same wild cabbage plant.

Photo from University of Nebraska
Kohlrabi was bred by selecting for thicker stems; cauliflower through selecting for thicker immature florets; broccoli was selected for thicker florets and floral stems. While selecting for a thick terminal bud gave us cabbage, selecting for many enlarged axillary buds (the "sprouts") gave us brussels.

I’m glad I successfully dipped my toe in growing kohlrabi this spring, but I’m partial to growing cole crops for a fall harvest for a few reasons. First, it’s easier to direct seed. Cole crops like soil temperatures around 80ºF for germination, but they can bolt or become overly tough or bitter if temperatures are too warm, especially around heading. Combined with relatively long time to maturity, it’s a challenge to get the timing right when starting these plants from seed in the spring.

Pest pressure can also be eased in planting for a fall harvest. I tend to have issues with flea beetles. Most flea beetle damage is caused by adults, which chew characteristic “shot holes” on the interior of leaves. While plants can withstand quite a bit of this type of injury once established, flea beetles can be tough on younger plants. In my fall crop, I get to avoid their most active time in vegetable gardens (late May and early June in my area).


With early kohlrabi varieties maturing in as little as 40 days, and most common varieties maturing in around 60, July to August is a good time to seed your fall crop for a harvest in September, depending on your location. They can withstand some frost, and bonus, you can get bigger, sweeter harvests with a fall crop. Kohlrabi is usually harvested when the bulbous stem is 2-3” wide. After this point, the stem can become woody in higher temperatures, but cooler temperatures in the fall will keep them more tender longer.


Like familiar Brassicas, kohlrabi is a heavy nitrogen feeder and requires ample moisture and space to develop properly. Use an organic mulch to help regulate moisture and soil temperature. Most varieties require a minimum of 12” spacing, but always check your seed packet for specific information. Planting too close together may result in elongating of the stems rather than the thickening you want to see. Harvest the whole plant (I’m a big fan of the greens) by cutting just above the soil surface. Kohlrabi can be stored for months in cold, moist conditions (around 36ºF and 95% humidity), but most of us can’t create these conditions at home. Kohlrabi will last a couple of weeks after harvest in your refrigerator. 


For more information on cole crops and other ideas for your fall vegetable garden, check out the new Colorado Vegetable Guide.

Thursday, July 11, 2019

Who's That Larva?


Posted by Sarah Schweig, Broomfield County Extension

Insects that undergo complete metamorphosis will go through a larval stage or stages in which they are unrecognizable from their future (adult) selves. It can be tough to identify larvae, but it’s important for a few reasons. While adults may be more familiar to us, larvae can make their mark on their environment, whether positive or negative, because they’re such voracious eaters. Larval and adult stages often have different roles in the environment as well. Some adult lacewings, for example, prey on garden pests as adults, but many subsist mainly on pollen and nectar. Green lacewing larvae, however, are sometimes called “aphid lions” for the quick work they make on the pests, and in fact they’re generalists and will prey on plenty of other unwanted garden guests as well. We've seen lots of interesting larvae lately - here are some highlights!

Carpet beetle larvae found in a camper van
May

Dermestid beetles are found throughout the state. While some like those of the genus Dermestes feed on meat-based materials, others like Anthrenus species can feed on wool-based furnishings, thus their common name, carpet beetles. They can be a pest in homes but are beneficial to natural ecosystems where they recycle nutrients by feeding on decaying matter.


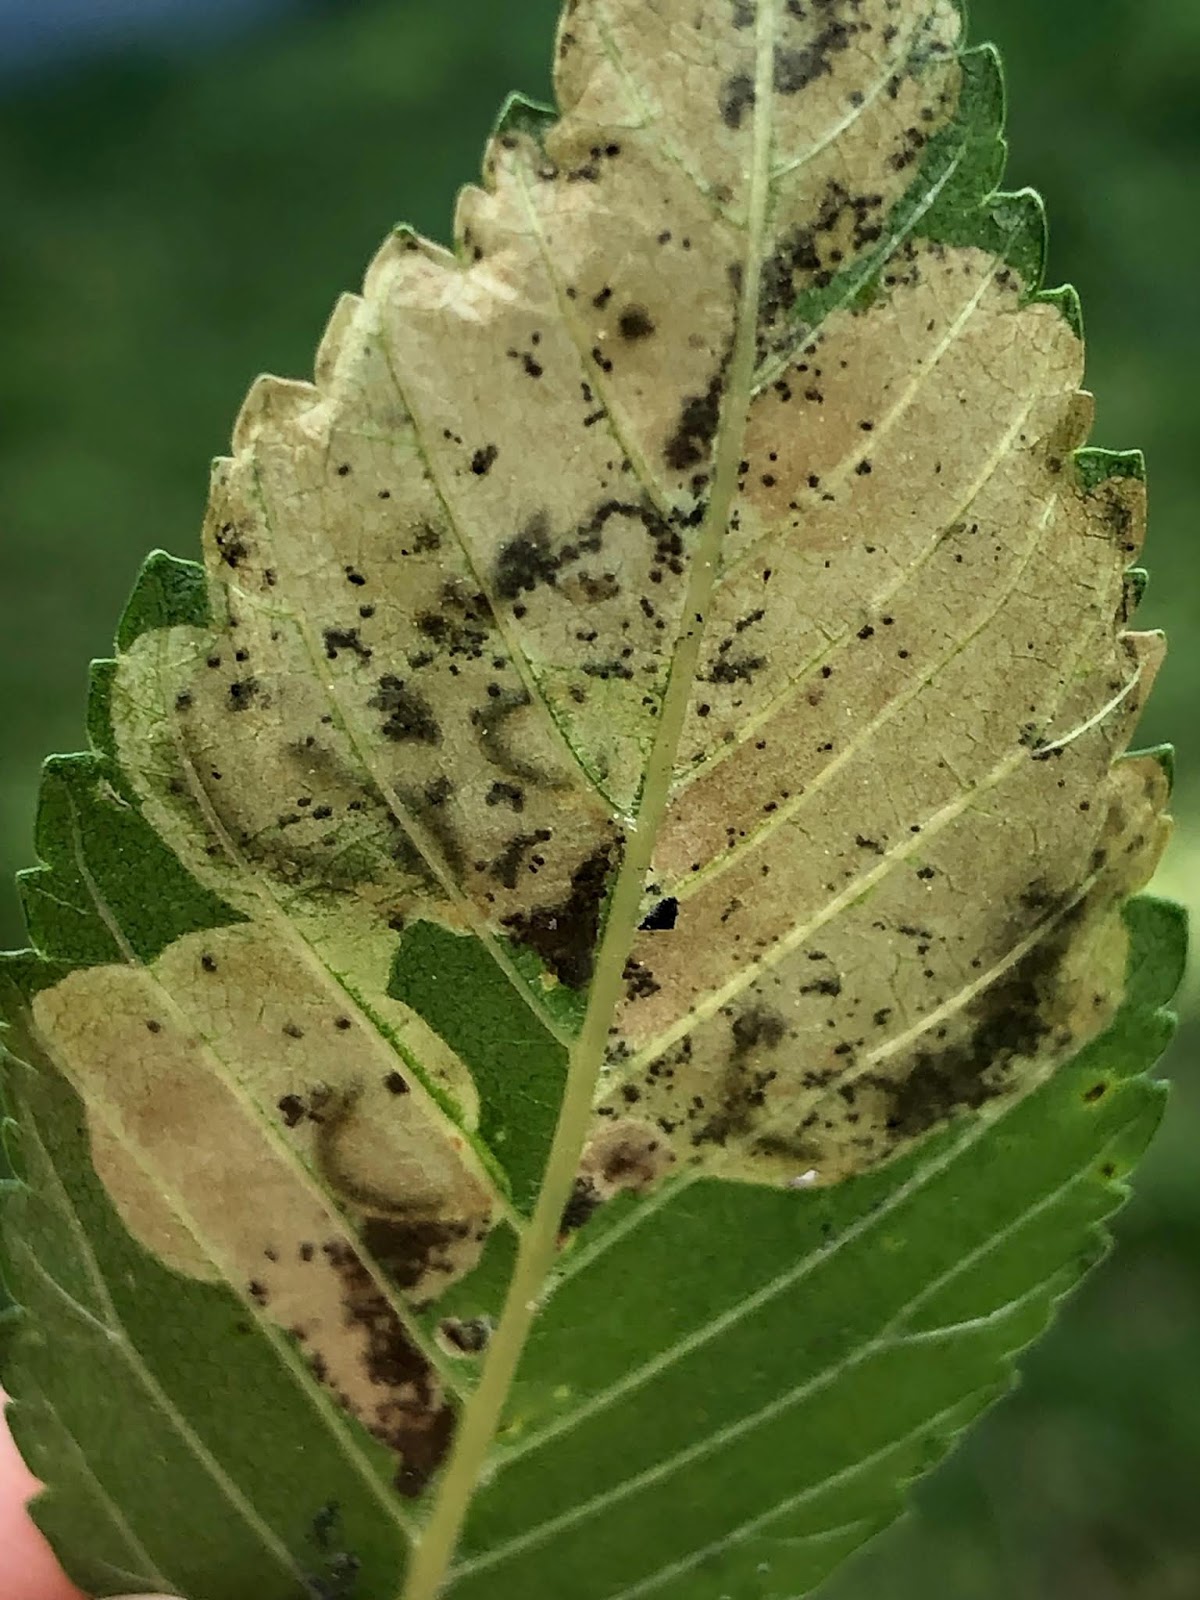
Elm leafminer larvae in Siberian Elm

June
Elm leafminers (Kaliofenusa ulmi) create blotchy leafmines as the larvae eat and develop in elm leaves. Once the larvae are fully grown, they drop from the leaf to the ground where they pupate until they emerge as adults the following season. Some seasons are worse than others, but there is only one generation per season, and the damage is usually just an aesthetic concern.
Corn earworm pupa found under soil in vegetable garden


July
So no, this is not a larva, but this pupa steals the show for July. Corn earworms (Heliothis zea), are also called tomato fruitworms or cotton bollworms, depending on who they're bothering. The larvae are an important pest of all of these crops, and they pupate beneath the soil before emerging as adults. A closely related pest, which looks very similar at this stage, is the geranium budworm (Helicoverpa virescens). Both have multiple generations in a season, and the pupae can overwinter in mild climates or years.


x

Tuesday, February 12, 2019

Cut Flower Challenges

Posted by: Sarah Schweig, Broomfield County Extension


Valentine’s Day is upon us. Love it, hate it, or indifferent, let’s at least appreciate the holiday as an excuse to enjoy fresh flowers! The beauty of cut flowers is ephemeral by nature, and maybe that’s part of the appeal. Still, folk remedies and DIY solutions for prolonging vase life abound. We can explore the science behind these solutions by taking a look at the most common reasons flowers don’t last at home.

Challenge: Insufficient food supply
DIY Fix: Table sugar
This idea here is simple. Plants need sugars to maintain cellular processes. Cut flowers have carbohydrates stored in leaves and stems, and these reserves will be depleted to maintain basic metabolic activity. For flowers that are harvested when fully open, like gaillardia or yarrow, insufficient food supply may lead to early senescence. For flowers that are harvested at earlier budding stages, like gladiolus or peony, insufficient food supply means those flowers may never fulfill their destiny.


Flower food is formulated to provide the ideal amount of sugar (typically glucose), as well as acidifiers (see next problem). However, because sugar is so essential to prolonged vase life and continued development, adding table sugar (sucrose) will do in a pinch.

Challenge: Microbial activity
DIY Fix: Softened water, lemon juice, aspirin, pennies
Unfortunately, plants aren’t the only sugar-lovers living in your vase water. Fresh cut flowers will lose some of those stored carbohydrates where the stems are cut, resulting in a sugary solution that encourages the growth of microbes. While supplemental sugar will support plants, it only exacerbates the microbe problem. Bacteria and fungi block flow of water and nutrients through xylem tissue, and some produce ethylene, which encourages senescence.


The vase life claims of our first DIY fixes are based on the fact that lowering the pH of your vase water will discourage microbial activity. Although hard water tends to be alkaline, chemically softened water contains sodium and should not be used in flower vases. The citric acid found in lemon juice, however, is quite effective and is a common component of commercial floral solutions. While dissolving aspirin in water does lower pH, studies are mixed on whether it has any effect on vase life. Even those studies that report a positive effect on vase life agree that floral solutions are much more effective.

Adding pennies to vase water is based on the fungicidal properties of copper. Pennies have been made from around 98% zinc since 1983, and the copper in pennies is not - and never was - water soluble. We can fully myth-bust this one (satisfying, huh?).

Challenge: Ethylene-induced senescence
DIY Fix: Vodka, gin, whiskey, etc.
Ethylene is a plant hormone involved in ripening and senescence, and thus there is generally an inverse relationship between ethylene and shelf-life. The principle here is that the ethanol, which is contained in distilled spirits, can affect the production of and response to ethylene. Ethanol has been shown to delay maturation in plants in a number of contexts. A study published in HortTechnology investigated adding distilled spirits to water to reduce tipping of paper white narcissus by reducing plant height. At certain concentrations of ethanol, plant height was successfully reduced without apparent toxicity to roots and with no effect on flower size or timing. Ethanol has also been shown to delay the ripening of tomatoes, among other fruits. While there is evidence to support this solution, at-home success would require a high level of precision. Depending on your vase size, the difference between an effective ethanol concentration and a toxic ethanol concentration could be a matter of a few drops!


What You Can Do
There are many practical and effective ways to reduce the effect of ethylene on your cut flowers without the need for laboratory precision. Place them in a spot with good air circulation, away from heat sources. Do not place flowers near your fruits and vegetables, which produce ethylene as they ripen.


Though I generally support the DIY spirit, commercial floral solutions are by far the safest bet for meeting your flowers’ basic needs. One size is not fits all for maintaining cut flowers. Roses and snapdragons, for example, need extra sugar to push blooms open. Sunflowers are highly susceptible to bacterial plugging of xylem tissue and may require a stronger biocide. While it’s tough to get a perfect solution for a mixed bouquet, you can get as close as possible by going with the pros on this one. Floral solutions are readily available and contain, at a minimum, necessary plant food and an acidifying agent to help keep xylem tissue freely conducting water and nutrients.


Another cause of reduced xylem function in cut flowers is embolism. Cut stems under warm water to help prevent these air bubbles from forming. Use clean, sharp tools to prevent crushing the stem tissue. Ensure that leaves growing below the water line, and any fallen leaves or flowers are removed, as this decaying matter will encourage microbial growth.


Eventually, even though you’ve done everything right, you’ll see signs of the battle with the microbes. When water turns cloudy or you notice fuzzy-looking growth on stems, change your vase water and re-cut stems.


How long will your Valentine’s Day flowers last? Try it out, maybe add a penny for good luck just in case, and let us know!

Monday, April 10, 2017

More Bees Please!

By:  Kelley Rawlsky - CSU Extension, Broomfield


Thinking back to my childhood days of sprinting across grandma’s clover lawn barefoot trying to avoid stepping on and consequently getting stung by bees, I never thought I’d be one to promote increasing their population. If you have ever stepped on a bee, it is quite painful. The stinger of the honey bee is barbed and embeds into the skin, and the stinger and poison sac are left behind. Does the honey bee really die after stinging? Unfortunately, yes.  

After studying horticulture and learning the importance of bees and other pollinators, I am firmly now on their side. Honey bees, in particular, are exceptional pollinators. Many crops, including apples, pears, peaches and melons, are dependent on them. CSU Extension has estimated the value of this pollination, which is provided freely from the local honey bees for our crops here in Colorado, at greater than $20 million annually. This doesn’t even include the several million dollars of honey and beeswax products that are also produced. So, bees are important!


We’ve all heard about the declining bee population. The reasons why this is occurring are varied and numerous, but the good news is we can do our part by planting more pollinator friendly plants in our yards. This will help the bee population by giving them nectar and pollen, but it will also help draw these pollinators to our yard so they can help pollinate our own edible gardens. 

 Attracting more bees to the yard is mostly beneficial, but if you or someone who frequents your yard is allergic to bee stings, then it might be a good idea to take a pause and rethink your approach to including a pollinator garden. Approximately one percent of the population develops hypersensitivity to bee or wasp stings which can then result in difficulty breathing, dizziness, nausea and hives. Symptoms, such as these, may require immediate attention from a physician.


In my own yard, planting a lot of pollinator plants has had some unintended consequences. Our 10 year old labrador retriever likes to snatch up flying, buzzing insects with her mouth. It’s quite obvious that she gets stung most of the time because of the way she shakes her head afterwards with a puzzled look. As many times as I try to explain to her that bees are our friends, she just doesn’t learn.


What to plant? Flowers! Here are some good choices that are water-wise and well adapted to our climate: Agastache rupestris (hummingbird mint), Echinacea purperea (purple coneflowers), Penstemon x. Mexicali, and Perovska atriplicifolia (Russian sage). For a more detailed list, see: Gardening for bees - or not! by Whitney Cranshaw, ColoradoState University. 


In case you're wondering, not all of the pics included are of honey bees. Maybe there's an entomologist out there who can identify them for us!